509-201-4190

Are you looking to upgrade your home’s exterior with vinyl siding? If so, installing starter strips is an important step in the process. Starter strips ensure that your siding looks great and is properly secured. In this article, we’ll explain why starter strips are essential and how to install them correctly. Let’s get started!
Disclaimer: The information provided in this article should be used as a guide only. We strongly advise seeking professional advice and/or help when installing vinyl siding starter strips or any other home exterior upgrades. To ensure a proper installation, it is best to consult with an experienced contractor. Advance Roofing LLC has been proudly providing the Spokane, WA area with high-quality roofing solutions for many years now and are more than happy to assist you with your project.
What is a Vinyl Siding Starter Strip?
Vinyl siding is one of the most affordable and durable siding options for homeowners. However, any vinyl siding installation needs to begin on the right foot with a vinyl siding starter strip. Not only does it serve as a foundation for your siding, but it also protects your exterior walls and helps to create a flat surface.
A vinyl siding starter strip is the inaugural piece of siding placed at the bottom of the exterior wall, running horizontal to ensure that the first row of siding is level. It is specially designed to provide a moisture barrier between the siding and the wall, preventing water damage that could lead to mold and mildew.
During vinyl siding installation, the first row of siding is installed onto the vinyl siding starter strip. It is important to get this step correct to ensure that the rest of the siding panels are installed smoothly, giving the exterior of the house a sleek and polished look.
Additionally, vinyl siding starter strips come with nail slots, which allow for easy installation of the strip. To prevent nail head damage, a vinyl siding snap-lock punch tool is recommended as it punches a slot in the siding without breaking it.
Before installing the strip, the installer should ensure that the surface is flat and secure. A piece of plywood or scrap piece of metal square can be used to level the surface.
Tools and Materials Needed for Installation
Before you can begin installing vinyl siding starter strips, it’s important to gather the necessary tools and materials. This will ensure that you have everything you need to complete the job correctly and efficiently. Read on for a detailed list of the tools and materials needed for vinyl siding starter strip installation.
Utility Knife & Starter Strips
When it comes to installing vinyl siding, getting the process started on the right foot is vital for a successful, long-lasting result. One of the most crucial components of this process is the use of a utility knife and starter strips.
Utility knives are a must-have tool when installing vinyl siding panels. In general, these knives are used to score the panel before snapping it cleanly on the scored line. This creates a crisp, precise cut that’s essential for a seamless and professional-looking installation.
In addition to using a utility knife, the installation of starter strips is equally important for ensuring that the siding is properly anchored and secured. These strips must be the first step in the installation process, and they serve as the foundation for the entire project.
To install starter strips, you’ll need to begin by snapping a level chalk line where the top of the starter strip will be on each wall. Then, position the bottom edge of the starter strip 1/4 inch above the bottom of the corner trim, with the strip’s end at least 1 inch away from the outside corner trim.
Once you’ve positioned the starter strip correctly, it’s time to secure it in place. To properly install the strip, it is recommended to use nails to affix it to the sheathing and bottom of the mudsill or sole plate. When using metal starter strips, it is advised to use nails every 16 inches. For vinyl strips, drive nails every 16 inches loosely.
By using a utility knife to cut vinyl siding panels and properly installing starter strips, you can set yourself up for a successful installation project that will stand the test of time. And remember, high-quality materials and the assistance of a siding expert or supplier can also help ensure that your project is a hit.
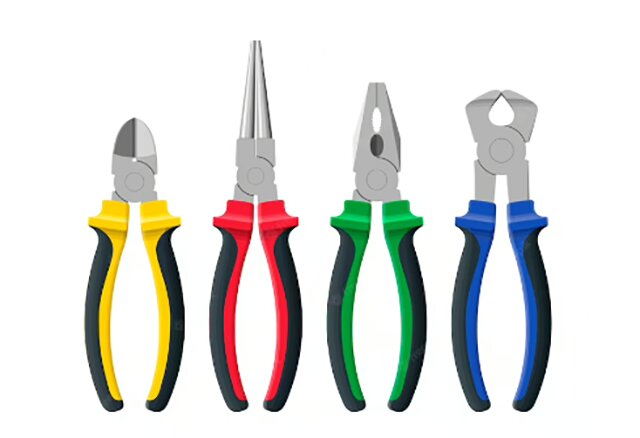
Corrosion-Resistant Nails, Tin Snips, and Zip Tool

When it comes to installing vinyl siding starter strips, using the right tools can make all the difference. In addition to a utility knife, there are several other tools that are essential for ensuring a secure and professional-looking installation.
One of the most important tools to use when installing vinyl siding starter strips is corrosion-resistant nails. These types of nails are designed to withstand exposure to moisture and other weather elements, which is important in ensuring that the nails won’t rust or otherwise become damaged over time. Corrosion-resistant nails are an essential component of any vinyl siding installation project, as they help to ensure that the installation will last for years to come.
Another essential tool for installing vinyl siding starter strips is a pair of tin snips. These tools come in handy when sizing the starter strip to fit the designated area. Tin snips are designed to cut through metal with ease, which makes them ideal for cutting through vinyl starter strips. By
using tin snips, you can ensure that your starter strip fits perfectly into the designated space, which is essential for a secure and professional looking installation.
A zip tool is another tool that can come in handy when installing vinyl siding starter strips. These tools are designed to facilitate a cleaner finish around corners and edges, making them ideal for ensuring that your starter strip is securely and neatly installed. By using a zip tool, you can ensure that your starter strip looks polished and professional, which can help to improve the overall curb appeal of your home.
Overall, using corrosion-resistant nails, tin snips, and a zip tool can help to ensure that your vinyl siding starter strips are installed securely and professionally. By investing in these essential tools, you can get a clean slate and a fresh start in terms of your home’s exterior.
Snap-Lock Punch Tool
When it comes to vinyl siding installations, the snap-lock punch tool is one of the most essential tools for ensuring an efficient and correct installation. This tool creates “lugs,” which are small tabs on the edge of the siding panels that form a secure and long-lasting bond between the panel edges during installation.
The snap-lock punch tool is primarily useful for locking the top of one siding panel into the bottom of the previous panel, creating a secure and weather-resistant seal. By using this tool, you can ensure that your vinyl siding installation will be tight, secure, and resistant to environmental factors such as wind and rain.
In addition, the snap-lock punch tool is also useful for creating punch holes in J-channel trims, which are important components of vinyl siding installations. These trims are designed to receive the siding panels and provide a finished edge for the exterior wall. By creating punch holes with the snap-lock punch tool, the J-channel trims are ready and secure to receive a siding panel, ensuring a secure installation that will last for years to come.
In summary, the snap-lock punch tool is a vital tool for any vinyl siding installation project. By creating lugs on the edge of the siding panels, this tool ensures a secure and long lasting installation that will resist environmental factors and provide a professional finish to your home’s exterior. Additionally, by creating punch holes in J-channel trims, the snap lock punch tool helps to ensure a properly installed and secure vinyl siding project.
Choosing the Right Type of Vinyl Siding Panel
When it comes to choosing the right type of vinyl siding panel for your home, there are a few key factors to consider. From the style of vinyl siding to the color and texture options available, it’s important to weigh your options carefully to ensure that you’re selecting the best possible choice for your needs. In this article, we’ll take a closer look at the factors to consider when choosing vinyl siding panels so that you can make an informed decision for your home’s exterior.
Horizontal vs. Vertical Siding Panels

Vinyl siding panels are a popular choice for homeowners looking to refresh the exterior of their homes and enhance their curb appeal. These panels come in both horizontal and vertical orientations, and each type requires specific installation methods.
Horizontal siding panels are installed one row at a time, with each panel overlapping the previous one by at least an inch. The first row starts with a starter strip attached to the bottom of the exterior wall, and subsequent rows snap into the strip’s lower edge. This provides a flat surface for the first row to snap onto and ensures that the panels are installed straight and level.
Vertical siding panels, on the other hand, run from the bottom to the top of the house, and the strips are nailed horizontally on 12 to 16-inch centers. Each panel overlaps the previous one by an inch or less. A critical factor in vertical siding installation is ensuring the strips’ proper spacing to maintain a flat surface.
Regardless of the siding panel’s orientation, some essential steps are necessary to ensure proper installation.
Furring strips must be installed vertically on the house’s exterior wall before the starter strips. This helps to create a flat surface that prevents bulges and waves from the siding panels.
Another vital element of vinyl siding installation is making sure that the edge seams of the siding panels are staggered by two feet from one row to the next. This breaks up the pattern, making it less noticeable, and also helps to ensure the panels’ stability in high winds.
Finally, tucking the angled edges of the siding panels into the j-channel, which hides the edges, ensures a clean and seamless look for your home’s exterior.
By following these steps, you can install vinyl siding panels correctly, whether they are horizontal or vertical, and enjoy their long-lasting benefits for years to come.
Installing Starter Strips
The installation of vinyl siding starter strips is an important aspect of any siding project as it establishes a sturdy base for the siding panels, guarantees their alignment, and prevents any irregularities from occurring. Follow these instructions to ensure a clean, seamless look for your home’s exterior and a long-lasting siding installation.
Mark Corner Posts and Measure Lengths of Starter Strips

Starting on the right step is essential to ensure that your vinyl siding installation is strong and long-lasting. If you’re planning to install vinyl siding, you must begin by accurately measuring and marking the corner posts and lengths of the starter strips.
To properly place the corner posts when installing siding, utilize a tape measure to obtain the measurements of the inner and outer corner posts on the wall. This will aid in determining the positioning of the corner posts and the necessary length of the starter strip. Take note of the measurement and mark the posts with a pencil or a marker.
Next, measure the length of the wall from the corner. Make sure to leave an allowance for the corner posts and an additional ¼ inch. This will allow you to properly install the vinyl siding starter strip and ensure proper overlap with the next piece of siding. Make an accurate measurement of the wall and mark it using a pencil or a marker.
Based on your measurements, cut the starter strip to the exact size you need using a pair of tin snips or a utility knife. You want to ensure that the starter strip fits perfectly and does not leave any gaps or spaces that could result in moisture, mold, or mildew problems.
Cut the Starter Strip to Size with Utility Knife or Tin Snips
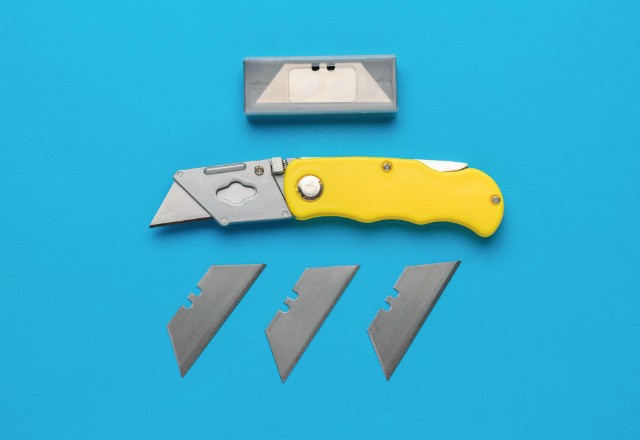
When installing vinyl siding, it’s important to get the starter strip cut to size correctly, which ensures a proper installation and a seam that won’t let moisture in. To cut the starter strip to size, you will need a utility knife or tin snips and a measuring tool.
Begin by measuring the length needed for the area you’ll be covering, making sure to leave a little extra for overlap. Mark the strip with a pencil, ensuring that your markings are straight and accurate.
Next, using a utility knife or tin snips, cut the starter strip to the appropriate length. If using tin snips, be sure to keep the blades slightly open at the end of each stroke to ensure a clean cut.
For optimal use of a utility knife, it is suggested to score the strip on the side facing up and then snap it in a backward direction.
Remember to also follow any cutting guidelines recommended by the manufacturer to ensure the best results.
By cutting the starter strip to the appropriate size, you’ll ensure a smooth and moisture proof bottom edge for your vinyl siding panel. Using a utility knife or tin snips to make the cut is an easy and precise way to get the job done right.
Secure the First Strip to Corner Post with Nails or Nail Slots
Once you have your vinyl siding starter strip cut to the appropriate size, it’s time to secure it to the corner post. This is an important step in the overall vinyl siding installation process, as the starter strip sets the foundation for the entire row of siding that follows.
To secure the starter strip, you can either use nails or nail slots that are built into the strip itself. Start by aligning the bottom of the strip with the lowest corner of the exterior wall and sliding it into the J-channel trim. Ensure that the strip is level and flat before nailing it to the wall.
If you’re using nails, it’s important to choose corrosion-resistant nails that can withstand the outdoor elements. Locate the nail slot, which is located at the top of the strip and should be covered by the first row of siding, and hammer in the nail. Be sure to place the nail in the center of the nail slot to allow for expansion and contraction of the vinyl siding.
Alternatively, if your starter strip comes equipped with nail slots, simply slide the nail into the pre-made slot and hammer it into place. Just like with regular nails, make sure to use corrosion-resistant nails.
By securing the first strip properly to the corner post, you’ll be setting the stage for a successful vinyl siding installation. Remember to always follow building codes and manufacturer recommendations to ensure a proper installation.
Slide in J-Channel Trims Around Vents, Doors, Windows, etc.

When installing vinyl siding, J-Channel trims play a significant role in achieving a clean and polished appearance while also providing necessary water runoff. These trims are particularly useful when fitting siding panels around openings such as vents, doors, and windows. Here is a step-by-step guide to properly install J-Channel trims around these areas:
- Start by measuring and cutting the J-Channel trim pieces to the appropriate length. The length should be 1/2 inch longer than the height of the vent, door, or window to allow for water runoff.
- Attach the top and side pieces of the J-Channel trim around the opening, making sure to secure it properly using nails or other methods recommended by building codes.
- Leave around 1 inch of extra space on the ends of the top piece to create drain tabs.
- Next, fold the drain tabs down over the window or door to channel water around them. To make the tabs, bend the extra 1 inch of the top J Channel trim downward twice to make a right angle.
- Finally, nail the J-Channel around the frames of windows and doors, with the top tab bent to fit around the corner, and ensure that it is flush against the wall.
By installing J-Channel trims in this manner, you can ensure that your vinyl siding panels around openings are properly secured, and water runoff is kept at a minimum. It’s important to use appropriate nails and follow the manufacturer’s instructions for a proper installation. With this technique, your vinyl siding installation will be both functional and aesthetically pleasing.
Attach New Piece of Siding Directly to Corner Post or J-Channel Trim
When it comes to installing new vinyl siding, attaching it directly to a corner post or J channel trim is a common task that requires some know-how. In this guide, we’ll walk you through the steps and give you some tips along the way.
- Determine if the panel needs to be cut to fit around any obstacles such as vents, windows, or doors. If so, take accurate measurements and use a utility knife or tin snips to cut the siding panel to the correct size.
- Secure the starter strip to the corner post with nails, making sure to keep each nail in the center of its slot. The starter strip is an important component that helps ensure proper installation and stability for the rest of the siding.
- Slide J-channel trims around any obstacles and nail them in place, leaving 1-inch-long drain tabs at the ends of the top piece. These tabs will help channel water away from the obstacle and prevent damage to the siding.
- Insert the new piece of siding into the J-channel trim or line it up directly with the corner post. Make sure it is level and aligned properly before moving on to the next step.
- Nail the new siding panel in place every 12 inches, starting at the top and working your way down. It’s important to use corrosion-resistant nails and to keep them in the center of each slot to allow for expansion and contraction.
By following these steps and taking the time to properly install each piece of siding, you can ensure a long-lasting and attractive finish for your home. And, don’t forget to consult with a siding expert or supplier if you have any questions or need additional advice.
Conclusion
Overall, taking the time to properly install the vinyl siding starter strip sets the foundation for a successful siding installation and enhances the curb appeal and value of the home. So, it is important to execute this process carefully and precisely to achieve the best results.