509-201-4190

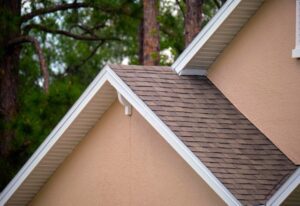
Are you wondering how to replace a fascia board on your home? Roof fascia boards play a crucial role in protecting your roof and home from water damage, but over time, they can deteriorate due to exposure to the elements. Fascia board replacement may seem like a daunting task, but with the right tools and knowledge, you can successfully tackle this project yourself. In this comprehensive guide, we’ll walk you through the process of how to replace a fascia board, providing you with expert tips and tricks to ensure a seamless and long-lasting result.
What is a Fascia Board and Why Replace It?
A fascia board, also known as a facia board, is a horizontal board that runs along the lower edge of your roof, supporting the bottom row of shingles and the gutter system. Its primary purpose is to protect the interior of your home from water damage and pest infestations. However, due to constant exposure to the elements, fascia boards can deteriorate over time, leading to rot, decay, and structural damage.
Reasons to replace a fascia board include:
- Visible signs of rot or decay (fascia board rot)
- Cracks, splits, or warping
- Peeling paint or discoloration
- Animal or insect infestations (e.g., bees in fascia boards)
- Improper installation or lack of maintenance
Replacing a damaged fascia board is essential to maintain the integrity of your roof and protect your home from costly water damage and roof damage.
Tools and Materials Needed
Before you begin the process of replacing a fascia board, gather the following tools and materials:
Tools | Materials |
Hammer or nail gun | New fascia board (measured to size) |
Pry bar | Exterior-grade nails or wood screws |
Circular saw | Exterior-grade caulk |
Electric screwdriver or drill | Exterior paint or wood stain |
Tape measure | Paintbrush or sprayer |
Carpenter’s pencil | Safety gloves |
Ladder | Safety glasses |
Utility knife | Putty knife |
Power tools (optional) | Metal drip edge (optional) |
Make sure to choose a high-quality, pressure-treated wood or composite materials for your new fascia board to ensure longevity and resistance to moisture and pest damage. Standard fascia boards are typically made from wood, but PVC and composite options are also available for enhanced durability.

Preparing for the Replacement
Before you start replacing your fascia board, take the following preparatory steps:
- Inspect the extent of the damage and measure the length of the fascia board that needs to be replaced. If the damage is extensive or you notice signs of fascia board decay, consider replacing the entire roof fascia for a uniform appearance and to prevent future issues.
- Remove any gutters or downspouts attached to the fascia board. Carefully set them aside for reattachment later.
- Ensure that you have a stable and safe work area. Set up a sturdy ladder on even ground and have a helper nearby to assist you if needed.
- If your fascia board is attached to a drip edge, remove it carefully using a pry bar or utility knife. The drip edge helps protect the fascia board against water damage and directs water away from the roof decking.
Removing the Old Fascia Board
Now that you’re prepared, follow these steps to remove the old fascia board:
- Using a pry bar, gently lift the bottom row of shingles or roofing material above the fascia board to expose the nails or screws holding it in place.
- Remove the fasteners using a hammer, pry bar, or electric screwdriver. If the fasteners are difficult to remove, use a reciprocating saw to cut them flush with the board. Be careful not to damage the surrounding roof rafters or rafter boards.
- Carefully pull the old fascia board away from the roof, being mindful of any remaining fasteners or debris. If the board is attached at 45-degree angles or around corners, use a utility knife to score the board and snap it along the scored line for easier removal.
- Inspect the exposed roof rafters for any signs of rot or damage. If necessary, make repairs before installing the new fascia board.
- Dispose of the old fascia board properly, following your local waste management guidelines.

Installing the New Fascia Board
With the old fascia board removed, it’s time to attach new fascia board. Here’s how:
- Measure and cut the new fascia board to the appropriate length using a circular saw. Make sure to wear safety glasses and gloves during this process. If you need to match fascia board pieces for a seamless look, make sure to cut them at 45-degree angles for a clean joint.
- If your new fascia board is not pre-primed, apply a coat of exterior primer to all sides and edges of the board to protect it from moisture damage.
- Position the new fascia board against the roof rafters, ensuring it sits flush against the roof decking and is level with the roof edge. If you’re installing a metal drip edge, place it over the top edge of the fascia board before securing the board in place.
- Secure the fascia board using exterior-grade nails or wood screws. Drive the fasteners through the board and into the roof rafters at regular intervals (approximately every 16 inches) using a hammer or nail gun. Make sure the fasteners are flush with the board’s surface to create a flat surface for painting.
- If you’re installing the fascia board in sections, make sure to butt the ends together tightly and apply a bead of exterior-grade caulk to the joint for a seamless appearance and added protection against water infiltration. Use a putty knife to smooth the caulk and create a clean seam.
- If your fascia board installation requires you to wrap the board around corners, make 45-degree cuts at the corner locations and join the pieces together with exterior-grade caulk and fasteners for a secure and seamless fit.
Finishing Touches
Once your new fascia board is installed, complete the following finishing touches:
- Fill any visible nail holes or gaps with exterior-grade wood filler, using a putty knife to smooth the surface.
- Sand any rough edges or surfaces using medium-grit sandpaper for a smooth finish.
- Apply a coat of exterior paint or wood stain to the fascia board, matching the color to your home’s existing trim. Use a paintbrush or sprayer for even coverage and allow adequate drying time between coats.
- Reattach any gutters or downspouts that were removed during the process, ensuring they are securely fastened and properly aligned.
- Clean up your work area, dispose of any debris, and store your tools properly for future use.
Maintenance and Prevention
To keep your newly replaced fascia board in top condition and prevent future damage, follow these maintenance tips:
- Regularly inspect your fascia boards for signs of damage, rot, or peeling paint. Address any issues promptly to prevent further deterioration.
- Keep your gutters and downspouts clean and free of debris to ensure proper water flow away from your fascia boards and home.
- Trim any overhanging tree branches that may drop leaves or debris onto your roof and gutters, contributing to moisture buildup and potential fascia board damage.
- Repaint or restain your fascia boards every 5-7 years, or as needed, to maintain their appearance and protect them from the elements.
By following these maintenance practices, you can extend the life of your fascia boards and safeguard your home from water damage and pest infestations.