509-201-4190

Roof flashing is a critical component of your roof that helps prevent water from seeping into your home at vulnerable points, such as around chimneys, vents, and valleys. When flashing becomes damaged or deteriorates over time, it can lead to leaks, water damage, and other costly issues. Knowing how to repair roof flashing is an essential skill for homeowners who want to maintain the integrity of their roofs and avoid expensive repairs down the line.
In this comprehensive guide, we’ll walk you through the process of identifying, assessing, and repairing various types of roof flashing. By following these step-by-step instructions and expert tips, you’ll be well-equipped to tackle most common flashing issues and keep your roof in top condition for years to come.
Types of Roof Flashing and Their Functions
Before we dive into the specifics of how to repair roof flashing, let’s review the different types of flashing and their roles in protecting your roof:
- Drip Edge Flashing: Installed along the edges of your roof, drip edge flashing guides water away from the fascia and into the gutters, preventing moisture damage.
- Valley Flashing: Used in the valleys where two sloping roof planes meet, valley flashing directs water flow and prevents leaks at these vulnerable points.
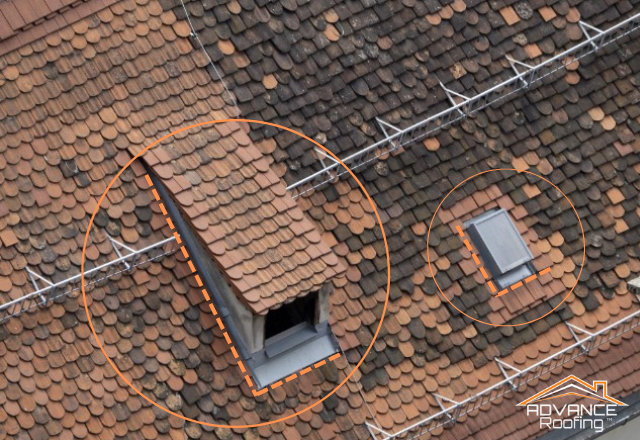
- Step Flashing: Installed along the sides of chimneys, dormers, and other vertical roof projections, step flashing is interwoven with shingles to create a water-resistant barrier.
- Vent Pipe Flashing: Designed to fit snugly around plumbing vents and other pipes that protrude from the roof, vent pipe flashing prevents water from seeping in around these openings.
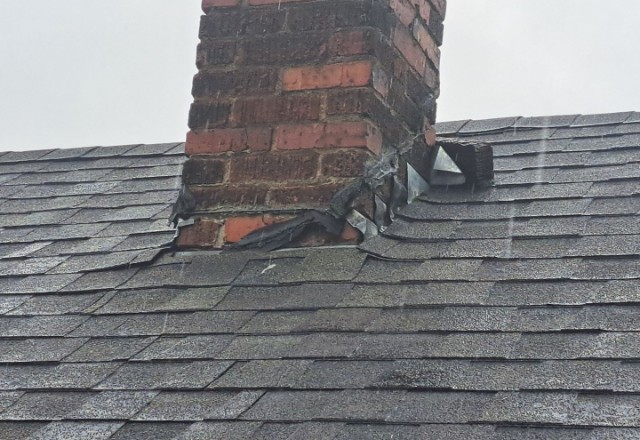
- Chimney Flashing: Consisting of step flashing and counterflashing, chimney flashing creates a watertight seal around the base of your chimney.
- Skylight Flashing: Installed around the perimeter of skylights, this type of flashing ensures a weatherproof seal and prevents leaks.
Understanding the different types of roof flashing and their functions will help you identify and address specific issues when repairing your flashing.
Common Roof Flashing Problems
Over time, roof flashing can develop various issues that compromise its ability to protect your home from water damage. Some common problems include:
- Corrosion and Rust: Metal flashing can corrode or rust due to exposure to moisture and the elements, weakening its structure and allowing water to penetrate.
- Cracks and Holes: Physical damage, such as from falling branches or hail, can cause cracks or holes in flashing, providing a pathway for water to enter your roof.
- Loose or Missing Flashing: Improper installation, strong winds, or age-related deterioration can cause flashing to become loose or even detach from your roof.
- Improper Installation: If flashing is not installed correctly, such as with inadequate overlap or sealant, it may not provide a watertight seal and can lead to leaks.
- Age-Related Deterioration: As your roof ages, the flashing may become brittle, cracked, or otherwise degraded, reducing its effectiveness in preventing water intrusion.
Regularly inspecting your roof and being aware of these common flashing problems can help you identify and address issues before they cause significant damage to your home.
Type of Flashing | Common Issues | Repair Difficulty |
Drip Edge | Rust, loose sections | Easy to moderate |
Valley | Rust, cracks, loose sections | Moderate to difficult |
Step | Loose or missing pieces, rust | Moderate to difficult |
Vent Pipe | Cracked or deteriorated rubber boot | Easy to moderate |
Chimney | Rust, cracks, gaps, loose step flashing | Difficult |
Skylight | Cracks, gaps, loose sections | Moderate to difficult |
Note: The difficulty of roof flashing repairs can vary depending on the extent of the damage, the accessibility of the area, and the individual’s experience and comfort level with roof work. When in doubt, consult a professional roofing contractor to ensure the best results and protect your safety.
Tools and Materials Needed for Roof Flashing Repair
Before you begin any roof flashing repair project, gather the necessary tools and materials to ensure a safe and successful job:
- Ladder
- Safety gear (non-slip shoes, gloves, safety harness)
- Pry bar
- Roofing nails
- Hammer
- Caulking gun
- Roofing cement or sealant
- Replacement flashing material (if necessary)
Having the right tools and materials on hand will streamline the repair process and help you achieve the best results.
Safety Precautions for Roof Flashing Repair
Working on a roof can be dangerous, so it’s crucial to prioritize safety when repairing your roof flashing. Keep these precautions in mind:
- Proper Ladder Placement and Usage: Ensure your ladder is stable, level, and extends at least three feet above the roofline. Maintain three points of contact when climbing and avoid overreaching.
- Working with a Partner or Spotter: Have someone assist you by holding the ladder and providing support from the ground.
- Avoiding Wet or Windy Conditions: Do not attempt roof repairs during rainy, snowy, or windy weather, as this can increase the risk of slips and falls.
- Wearing Appropriate Safety Gear: Always wear non-slip shoes, gloves, and a safety harness when working on your roof to prevent accidents.
- Knowing Your Limits: If you are uncomfortable with heights, lack the necessary skills, or encounter a complex repair, don’t hesitate to contact a professional roofing contractor.
Step-by-Step Guide to Repairing Different Types of Roof Flashing
Now that you have your tools, materials, and safety precautions in place, let’s walk through the process of how to repair roof flashing for each type:
Drip Edge Flashing Repair
- Inspect the drip edge flashing for signs of damage, such as rust, cracks, or loose sections.
- If the flashing is loose, use a pry bar to gently lift the edges of the shingles above the flashing and remove any damaged nails.
- Apply a bead of roofing cement along the top edge of the flashing and press the shingles firmly into the cement.
- Secure the shingles with new roofing nails, ensuring they penetrate the flashing and decking.
- If the drip edge flashing is severely damaged or rusted, replace it with new flashing of the same material and dimensions.
Valley Flashing Repair
- Check the valley flashing for signs of wear, rust, or damage.
- If the flashing is loose or damaged, carefully lift the shingles on either side of the valley and remove the damaged flashing.
- Clean the area beneath the shingles, ensuring it is free of debris and old roofing cement.
- Install new valley flashing, ensuring it is centered in the valley and extends at least 4 inches under the shingles on each side.
- Apply a bead of roofing cement along the edges of the flashing and press the shingles firmly into the cement.
- Secure the shingles with roofing nails, taking care not to nail directly through the valley flashing.
Step Flashing Repair
- Examine the step flashing around chimneys, dormers, and other vertical projections for signs of damage or deterioration.
- If the flashing is loose or damaged, carefully remove the shingles above the flashing and the damaged flashing itself.
- Clean the area beneath the shingles and flashing, removing any debris or old roofing cement.
- Install new step flashing, ensuring each piece overlaps the one below it by at least 2 inches and extends at least 4 inches up the vertical surface.
- Apply a bead of roofing cement along the top edge of each piece of flashing and press the shingles firmly into the cement.
- Secure the shingles with roofing nails, ensuring they penetrate the flashing and decking.
Vent Pipe Flashing Repair
- Check the vent pipe flashing for signs of damage, such as cracks or gaps around the base.
- If the rubber boot surrounding the vent pipe is cracked or deteriorated, use a utility knife to carefully cut away the old boot.
- Clean the area around the vent pipe, removing any debris or old sealant.
- Install a new rubber boot over the vent pipe, ensuring it fits snugly and extends at least 2 inches onto the roof surface.
- Apply a bead of roofing cement around the base of the new boot and press it firmly onto the roof.
- Secure the boot with a stainless steel hose clamp, tightening it to create a watertight seal.
Skylight Flashing Repair
- Check the skylight flashing for signs of damage, such as cracks, gaps, or loose sections.
- If the flashing is loose or damaged, carefully remove the surrounding shingles and the damaged flashing.
- Clean the area around the skylight, removing any debris or old roofing cement.
- Install new flashing around the perimeter of the skylight, ensuring it extends at least 4 inches up the sides of the skylight and 4 inches onto the roof surface.
- Apply a bead of roofing cement along the top edge of the flashing and press the shingles firmly into the cement.
- Secure the shingles with roofing nails, ensuring they penetrate the flashing and decking.
- Apply a bead of silicone caulk around the perimeter of the skylight to create a watertight seal.
Chimney Flashing Repair
- Inspect the chimney flashing for signs of damage, such as rust, cracks, or gaps.
- If the step flashing is loose or damaged, carefully remove the surrounding shingles and the damaged flashing.
- Clean the area around the chimney, removing any debris or old roofing cement.
- Install new step flashing along the sides of the chimney, ensuring each piece overlaps the one below it by at least 2 inches and extends at least 4 inches up the chimney wall.
- Apply a bead of roofing cement along the top edge of each piece of step flashing and press the shingles firmly into the cement.
- Secure the shingles with roofing nails, ensuring they penetrate the flashing and decking.
- If the counterflashing is damaged, have a professional sheet metal fabricator create a new piece to fit your chimney.

Tips for Preventing Future Roof Flashing Issues
To minimize the need for roof flashing repairs in the future, follow these preventive maintenance tips:
- Regular Inspections and Maintenance: Schedule annual roof inspections to identify and address any flashing issues before they worsen.
- Cleaning Debris from Flashing and Gutters: Keep your roof and gutters free of debris, such as leaves and twigs, which can trap moisture and contribute to flashing deterioration.
- Addressing Rust or Corrosion Promptly: If you notice rust or corrosion on your metal flashing, clean it with a wire brush and apply a rust-inhibiting primer to prevent further damage.
- Ensuring Proper Installation of New Flashing: When installing new flashing, follow manufacturer guidelines and best practices for overlap, sealant application, and fastening to ensure a watertight seal.
- Applying Sealant or Roofing Cement as Needed: Regularly check for and fill any gaps or cracks in your flashing with roofing cement or sealant to prevent water infiltration.
When to Call a Professional Roofing Contractor
While many homeowners can successfully tackle minor roof flashing repairs, there are situations where it’s best to call in a professional:
- If the damage to your flashing is extensive or involves multiple areas of your roof
- If you’re unsure of the proper repair techniques or lack the necessary tools and safety equipment
- If your roof has a steep slope or complex design that makes repairs dangerous or difficult
- If you suspect underlying structural damage or leaks that may require more extensive repairs
A professional roofing contractor will have the expertise, experience, and equipment to assess the damage and perform the necessary repairs safely and effectively. They can also help you identify any additional issues with your roof and recommend the best course of action to protect your home.

Conclusion
Learning how to repair roof flashing is a valuable skill for any homeowner looking to maintain the integrity of their roof and prevent costly water damage. By understanding the different types of flashing, common problems that can occur, and the step-by-step process for repairing each type, you can confidently address most minor flashing issues on your own.
Remember to prioritize safety, work methodically, and always use the proper tools and materials for the job. If you encounter a complex repair or are unsure of how to proceed, don’t hesitate to contact a professional roofing contractor for assistance. With regular maintenance and timely repairs, your roof flashing will continue to protect your home for years to come.