509-201-4190

Do you have cracked wood siding that is making your home look dated and rundown? You don’t need to call a contractor or spend a lot of money to get your siding looking like new. With this step-by-step guide, you can repair the cracks in your wood siding yourself. We’ll walk you through everything from identifying the type of wood siding you have to patching up any cracks and applying a protective sealant. Let’s get started!
Disclaimer: This article is intended to provide helpful information on how to repair cracked wood siding, however, it should not be taken as a substitute for professional advice. If you are unsure about any of the steps outlined in this article, please consult with a qualified contractor or roofing specialist before attempting any repairs. We recommend Advance Roofing LLC for all roofing and siding repairs in the Spokane, WA area. With years of experience providing quality services to customers throughout the region, they are sure to get your wood siding looking like new in no time!
What is Wood Siding?
Wood siding is a popular building material that adds warmth, natural beauty, and curb appeal to any home. It’s a classic choice that is commonly used in exterior home design due to its versatility and durability. Despite its many benefits, wood siding can develop cracks and other signs of damage over time. In this guide, we’ll provide you with a step by-step process to help you repair and restore your wood siding to its former glory. So, let’s get started!
What Causes Cracked Wood Siding?
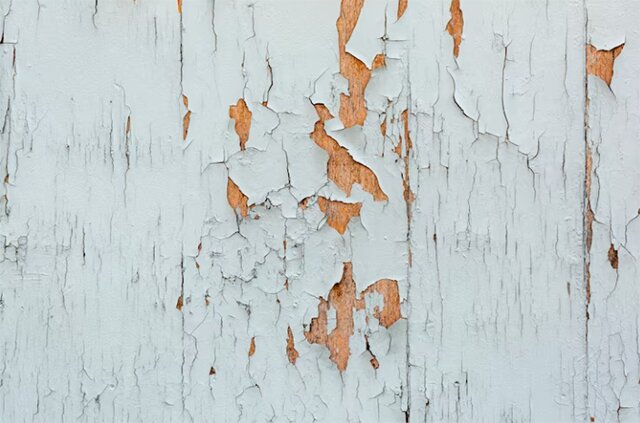
Wood siding is a popular choice for many homeowners due to its classic and natural look. However, it is vulnerable to various environmental factors that can cause damage and cracks. Causes of cracked wood siding can range from exposure to moisture, temperature fluctuations, insect infestation, and aging.
Ageing is a natural process that can cause wood siding to become brittle and prone to cracking. Over time, the wood fibers in the siding can break down, causing it to become weaker. This can result in the development of cracks that can easily spread and make the siding susceptible to further damage.
Moisture is another significant factor that can cause cracked wood siding. Over time, repeated exposure to water can cause the wood fibers to expand and contract, leading to cracking and warping. This can also make the wood more susceptible to insect infestation and decay, further weakening the siding.
Temperature fluctuations can also cause cracked wood siding. Extreme cold or heat can strain the siding, causing it to expand and contract. Over time, this can cause the wood fibers to weaken and crack.
Step 1: Preparation
Before beginning any repair project on cracked wood siding, it’s essential to properly prepare the area. This involves assessing the extent of the damage, gathering the necessary tools and materials, and taking the proper safety precautions. By taking the time to thoroughly prepare, you can ensure a successful repair and restore the siding to its original, like-new appearance. Now let’s move on to Step 1: Preparation.
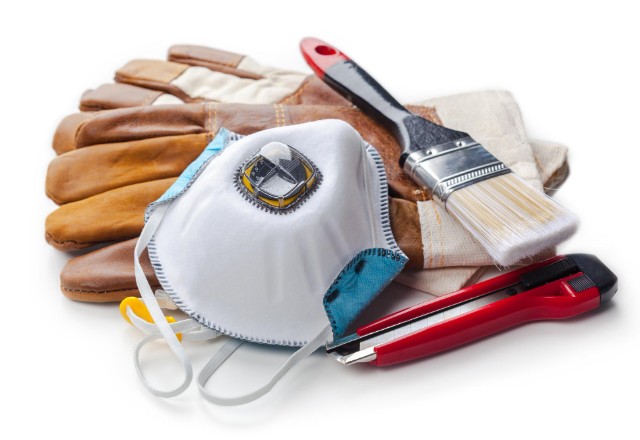
Safety Considerations
When it comes to repairing cracked wood siding, there are several safety considerations that need to be taken before proceeding with the repair process. Before you start, it’s important to prioritize your safety by taking appropriate safety measures.
Firstly, always make sure to follow ladder safety procedures to avoid any accidents or injuries. Be sure to carefully choose a sturdy ladder that is appropriate for the height you need to reach. Additionally, you should pay attention to any electrical wires and bee/wasp nests that may be present around your home. Always be mindful of these potential hazards and take precautions to avoid them.
Another safety consideration to keep in mind is the use of TSP or Trisodium Phosphate. TSP is a powerful cleaning agent commonly used in cleaning both wood siding and other exterior surfaces. However, it’s important to use caution when working with TSP and follow the manufacturer’s instructions carefully. Be sure to wear protective clothing such as gloves, goggles, and a face mask when handling this cleaning solution.
To prevent water damage, it’s essential to take steps to protect your siding before beginning the repair process. Keeping gutters clean and installing gutter guards will help ensure that water is properly diverted away from your home’s siding. Additionally, ensuring that your roofing system has proper flashing will also prevent water from entering your home and will extend the life of your siding.
Finally, during the repair process, it’s important to prioritize safety. Use caution when working with tools such as a utility knife or a pressure washer. Always wear eye protection to prevent debris from entering your eyes. Take care to avoid contact with any electrical lines or fixtures and use protective clothing such as gloves and long-sleeved shirts.
By following these safety considerations, you can help ensure that your repair project is successful while protecting yourself from any potential hazards.
Gather Necessary Materials and Tools
When it comes to repairing cracked wood siding, having the right tools and materials on hand is essential. Not only will this make the repair process smoother, but it will also ensure that the repair job lasts and maintains its aesthetic appeal. Here’s a comprehensive list of all the necessary materials and tools required for repairing cracked wood siding:
- Safety glasses: Safety should be your top priority when undertaking any repair project. Safety glasses protect your eyes from any debris that may fly off when cutting or nailing.
- Chisel: A chisel is a sharp tool used to remove damaged wood siding.
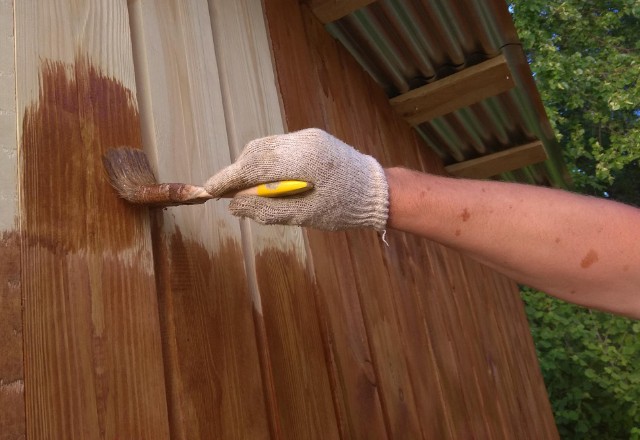
- Paint: Exterior paint is required to give the repaired area a fresh look that matches the rest of the house.
- Paintbrush: A paintbrush is used to apply the paint to the replacement wood siding and the repaired area.
- Measuring tape: A measuring tape helps to ensure that measurements are accurate, and the replacement wood siding fits precisely.
- Replacement wood siding: This is the key material required for the repair. Make sure to purchase replacement siding that matches the type of wood and finish of your existing siding.
- Nails: Stainless steel siding nails that are 1 3/4 inches long ensure that the replacement siding is properly secured to the home’s exterior.
- Borate: Borate is a wood preservative that helps protect against future wood damage.
- Sandpaper: Sandpaper is used to smooth rough edges on newly cut wood siding.
- Hammer: A hammer is required to drive nails into the replacement siding and to remove damaged siding.
- Circular saw: A circular saw is used to cut the replacement siding to the correct size and shape.
- Epoxy & epoxy primer: Epoxy is used to fill any large cracks or holes in the siding, and the epoxy primer is applied to ensure the repair job lasts.
- Utility knife: A utility knife is used to cut the caulking used to seal the siding.
- Acrylic caulking: Acrylic caulking is used to seal the replacement siding and fill in any gaps.
- Rag: A rag is used to wipe away any excess wood filler.
- Pencil: A pencil is used to mark measurements on the replacement wood siding before cutting.
With these tools and materials, you’ll be well-prepared to undertake a repair project on your cracked wood siding. Remember to always prioritize safety and take the necessary precautions when using power tools or working at heights.
Step 2: Assessing the Damage
Before you can begin repairing your cracked wood siding, you need to assess the extent of the damage. This will involve examining each piece of siding individually to determine whether it needs to be repaired or replaced. Once you have assessed the damage, you can move on to the next step of the repair process.
Signs of Structural Damage to Look Out For
Wood siding is a popular choice for homeowners across the globe because of its aesthetic appeal and durability. However, over time, it can become vulnerable to various types of damage. Structural damage, in particular, can be a bit harder to spot than cosmetic damage and can pose a significant threat if left unaddressed.
Here are some signs of structural damage in wood siding that you should look out for:
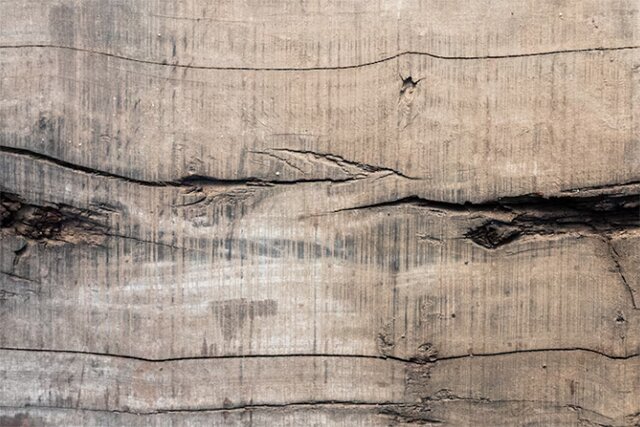
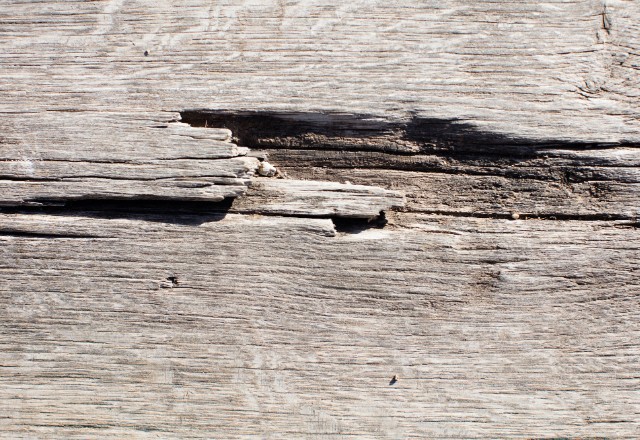
- Cracks and Gaps: One of the most common and easily recognizable signs of structural damage is the presence of cracks and gaps between panels. Hairline cracks and small gaps may not seem like a big deal at first, but over time they can allow moisture and other unwanted elements to penetrate the wood and cause further damage.
- Warped Boards: Another sign of structural damage is bowed or warped boards. This happens typically when the underlying structure has weakened, which causes the wood siding to bend or warp. Bowed or warped boards can be caused by various factors, like excessive exposure to sunlight, moisture damage, or improper installation.
- Excessive Moisture: Excessive moisture is the enemy of wood siding. It can cause rotting and create an environment for mold and mildew to grow. If you notice discoloration or soft spots at the bottom of the siding, it may be a sign of excessive moisture damage or rotting that has affected the structural support.
- Nail Head and Holes: Another indicator of structural damage is nail heads and holes. If the nails are starting to come loose or protrude from the wood, it may mean that the underlying structure is weakening. Holes in the siding can indicate that pests or animals have started to build nests or make their way into the structure, causing damage from the inside out.
To check for structural damage, use a level to examine the siding for any bulging or tilting, indicating issues with the underlying structural support. Moreover, there could be many causes for deterioration, including insect damage or water damage. Being proactive and identifying the signs of damage early is vital to prevent further issues, whether it’s structural or cosmetic.
Identifying Loose or Rotten Boards
When repairing cracked wood siding, identifying loose or rotten boards is crucial to achieving a like-new look.
To identify loose or rotten boards, it is essential to inspect the siding thoroughly for signs of warping, mildew buildup, and insect infestation. Start by examining the wood surface for any cracks running deep across the grain or areas with a soft and tender texture when poked with a knife or screwdriver. These are typical signs of rotting wood and should be addressed immediately.
Another indicator of loose or rotten boards is the growth of fungus or mushroom-like substances on the surface. These substances can often appear as off-white fibers and indicate that the wood has been affected by moisture and is likely to be rotting from within. When fungus is present, pay close attention to any adjacent boards as they may also be affected.
In addition to this, take the time to inspect brickwork adjacent to the wood siding. If there is a visible yellow or off-white tinge, this is a potential sign of water or moisture damage that may have caused the wood to rot.
If there is any evidence of loose or rotten boards, they will need to be replaced before repairing the cracked wood siding. Identifying these issues early on will prevent the damage from spreading and will ensure that the new boards blend seamlessly with the old. So, thorough inspection is the key to identifying and addressing loose or rotten boards in wood siding.
Examining Nail Heads, Holes, and Other Weak Points
When examining wood siding for potential repairs, it is essential to pay close attention to nail heads, holes, and other weak points. Over time, nails can rust, pop out of the wood, or break off completely, leaving the siding vulnerable to further damage.
Start by inspecting the nail heads along the surface of the siding. Look for any that have become discolored or rusted, as this can indicate structural damage. Lifting and missing nail heads can also be a sign that they have become weak over time and should be addressed before causing any further damage.
Next, identify any holes in the siding that could be breeding grounds for insects or water damage. Holes can be caused by a variety of factors, including weather damage or insect activity. Small holes may not seem like a big problem, but they can quickly worsen, leading to moisture damage and rotting wood.
To fix any imperfections on the surface of wood, it is recommended to use wood filler. It is important to ensure that the area is dry and free of debris before applying the filler, and a putty knife can be used to smooth it into place. Smooth over any excess filler and allow it to dry completely before sanding it down.
Inspect the siding for signs of moisture damage or rotting wood. If you find any mold or rotten wood, use a knife to cut away the affected area. It is crucial to remove all rotting material to prevent any further damage. Replace the damaged area with a solid piece of wood using stainless steel siding nails to ensure a secure fit.
By examining nail heads, holes, and other weak points on your wood siding regularly, you can prevent potential damage to your home and prolong the life of your siding.
Step 3: Repairing the Damage
When it comes to maintaining the curb appeal of your home, wood siding is a popular choice. Unfortunately, exposure to the elements can leave it cracked, damaged, and in need of attention. That’s why we’ve put together this step-by-step guide on how to repair cracked wood siding. In this guide, we’ll discuss how to identify the signs of damage, what tools you’ll need, and most importantly, how to repair the damage effectively. In this section, we’ll dive deeper into step 3: repairing the damage.
Removing Damaged Pieces of Siding
When it comes to repairing cracked wood siding, sometimes the damage is beyond simple repair and requires the removal of the damaged piece and replacement with a new panel or board. Here’s a step-by-step guide to help you remove the damaged piece without causing further damage to your home’s exterior.
Step 1: Assess the Damage.
Before you begin removing the damaged piece of siding, assess the extent of the damage to determine if a patch will suffice or if a replacement board or panel is necessary. If the damaged area is too large or the siding is structurally unsound, a replacement will be necessary.
Step 2: Prepare Your Tools.
To remove the damaged piece of siding, you will need a few tools including a utility knife or tin snips, a prybar or zip tool, and a hammer. Eye protection is also recommended.
Step 3: Cut and Loosen the Damaged Piece.
Using a utility knife or tin snips, cut away any excess wood filler or caulk around the damaged piece of siding. Then, use a prybar or zip tool to loosen the bottom lip of the side panel or board. Slide it out gently to separate it from the rest of the siding.
Step 4: Remove the Fasteners.
Once the damaged piece is free from the siding, use a hammer to remove any nails or screws securing the piece from the wall. Lift the panel or board above the damaged piece to locate any hidden fasteners and remove those as well.
Step 5: Replace the Damaged Piece.
After removing the damaged siding, replace it with a new panel or board that matches the rest of your siding. To install the new piece, slide it into place and secure it with stainless steel siding nails. Fill any nail holes or gaps with paintable caulk and allow it to dry. Finally, give the entire surface a fresh coat of paint.
Removing damaged pieces of siding can be a fairly easy task, especially with the right tools and a little know-how. By following these simple steps, you can restore your home’s curb appeal and prevent further wood damage. Remember to always follow building codes and wear protective clothing when carrying out any repair projects.
Replacing Boards with New Material
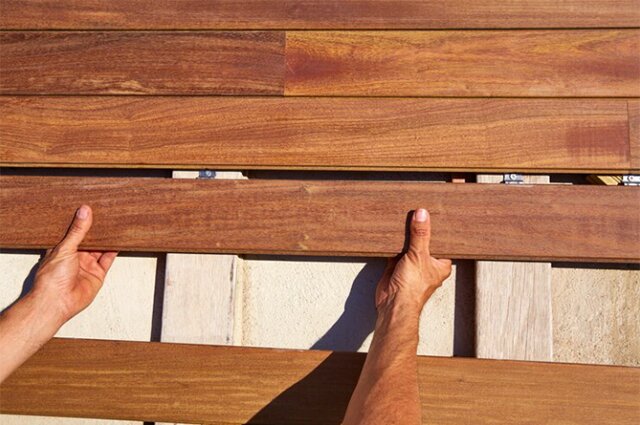
Replacing damaged or rotten wood siding boards can be a bit of a process, but it’s a necessary step in maintaining your home’s curb appeal and overall structural integrity. Here are some step-by-step instructions for replacing old wood siding with new material.
- Step 1: Remove the damaged siding. The first step is to remove the damaged boards from the exterior of your home. This can involve cutting through nails or screws that are holding the board in place, or prying it off with a pry bar. Be sure to wear protective clothing and eye protection during this process.
- Step 2: Measure the replacement board. Once you’ve removed the damaged siding, measure the space where the new board will need to fit. Measure the length, width, and thickness of the space so that you can purchase a new board that fits perfectly into the space.
- Step 3: Cut the new siding board. Using a saw, cut the new siding board to fit the measurements you took in step 2. Make sure that the new board is cut precisely, so that it fits snugly into the space where the old board was previously attached.
- Step 4: Install the new siding board. With the new board cut to size, it’s time to install it. Use stainless steel siding nails to attach the board to the exterior of your home. Be sure to also fill any nail holes or gaps with paintable caulk to seal the board and provide extra protection against moisture damage.
- Step 5: Finish the job. To complete the repair project, you’ll need to give the entire surface a fresh coat of paint. This will ensure that the new board blends in with the existing siding, and helps to protect the entire surface from further damage.
Securing Replacement Panels with Stainless Steel Siding Nails
If you’ve had to remove a piece of siding from your home due to damage or wear and tear, you’ll want to secure the replacement panel properly to ensure that it stays in place. Here’s how to do it using stainless steel siding nails:
- Alignment and positioning. Before you begin nailing, make sure that the replacement panel is properly aligned and positioned in the correct location. This will ensure that the new panel fits seamlessly with surrounding panels and doesn’t look crooked.
- Begin nailing at the top. Start by placing the first nail at the top of the panel, near the edge. This will help to anchor the panel into place. From there, you’ll work your way down the panel, nailing it securely to the exterior wall.
- Use 7d galvanized ring-shank nails. To ensure maximum durability and prevent rusting, use 7d galvanized ring-shank nails. Space the nails 6 inches apart along the vertical edges of the panel, and 8 inches apart in the field.
- Two nails at the ends of flat board sections. For flat board sections, it’s important to drive two nails at the ends of the section to help prevent the siding from expanding and buckling.
- Create vertical lines. Creating vertical lines using a long level can help guide nail placement in the field. This will ensure that each nail is placed in the correct location, creating a seamless look.
- Extra nails at top and bottom edges. Finally, make sure that the top and bottom edges of each sheet have extra nails to securely tie the top plate to the bottom plate. This will ensure that the panel stays in place and doesn’t move over time.
By following these steps and using high-quality stainless steel siding nails, you can easily secure replacement panels to your home’s exterior, creating a like-new look for improved curb appeal.
Step 4: Sealing and Finishing Up the Job
After successfully replacing the damaged wood siding, it’s time to seal and finish up the job. This step is crucial to protect the new siding from water damage or any other external factors. By following these instructions, you can ensure that your wood siding repair project not only restores the curb appeal of your home but also prolongs the life of your siding.
Applying Paintable Caulk to Seal Joints and Cracks
If you want to repair cracked wood siding, using paintable caulk to seal joints and cracks can be an effective solution. Not only can it improve your siding’s appearance, but it can also prevent further damage to your home. Here is a step-by-step guide on how to apply paintable caulk to your wood siding:
- Step 1: Make sure the surface is clean and dry. Before you begin, ensure that your siding’s surface is clean and free of any dirt, debris, or moisture. Use soapy water and a pressure washer to clean your siding thoroughly. If any signs of damage or structural damage are present, you may need to replace the damaged panels.
- Step 2: Clear the surface of any debris. Check for any remaining debris on the surface, such as loose paint, rotten boards, or excess wood filler, and remove it with a soft brush. This will ensure that the caulk adheres properly to the joint or crack.
- Step 3: Cut open the tube of paintable caulk. Using a utility knife, open a tube of paintable caulk and cut the tip at a slight angle. Be careful not to cut too much of the tip, or the caulk will not come out properly.
- Step 4: Apply the caulk to the joints and cracks. Squeeze a line of caulk into each joint or crack, making sure to fill it entirely. Avoid using too much caulk, as excess caulk can be difficult to remove and can cause a mess. For best results, apply a continuous and smooth line of caulk.
- Step 5: Smooth the caulk with a putty knife or finger. Use a putty knife or your finger to smooth the caulk into the joint or crack, pressing it firmly into place. Make sure the caulk has filled the entire space and that there are no gaps or air bubbles. Wipe away any excess caulk with a damp cloth.
- Step 6: Let the caulk dry completely. Allow the caulk to dry completely before painting over it. This will usually take between 24 to 48 hours, depending on the type of caulk you use and the temperature and humidity levels outside.
By following these simple steps, you can apply paintable caulk to seal joints and cracks on your wood siding for a like-new look. Remember to wear eye protection and protective clothing when working with caulk, and to follow all building codes and regulations related to repair projects. With a fresh coat of paint, your repaired wood siding can improve your home’s curb appeal and increase its value.
Final Touches
After repairing the cracked wood siding of your home, there are a few final touches you’ll want to apply to ensure a polished finish.
The first step is to apply paintable caulk to any other joints and cracks in the siding and the corners of your home. This will prevent further damage and improve your home’s overall appearance. Be sure to use a continuous, smooth line of caulk for best results.
Next, it’s important to trim around your windows with a style of your choice and leave a gap of up to 1/4 inch when cutting sheets to fit the house. This will ensure that the siding doesn’t become too rigid, which can lead to cracking or damage over time.
If there are any smaller cracks or holes, fill them with wood putty and sand them down to ensure a smooth surface. This will help to create an even finish when you paint your siding. After filling, prime and paint your wood siding using a two-part epoxy primer and paint to ensure optimal results.
Conclusion
In conclusion, repairing cracked wood siding can be an easy process with the right steps. Make sure to start by cleaning and drying the surface before applying caulk to fill any joints or cracks. Then, smooth the caulk with a putty knife or finger and let it dry completely before painting over it. Finally, apply paintable caulk around any other joints and windows, fill any holes or cracks with wood putty, and prime and paint your siding for optimal results. By following these steps, you can restore your home’s look in no time!