509-201-4190

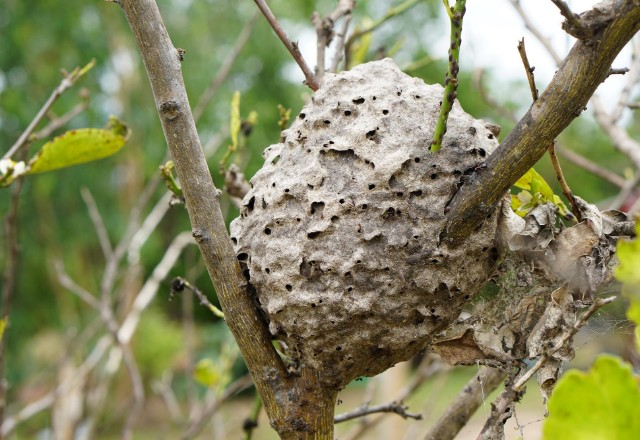
Opening your front door and being greeted by the buzz of an angry swarm is everyone’s nightmare. Hornets building expansive nests under the eaves of your home, in the outdoor light fixtures or on tree branches in backyard is an unpleasant surprise. Getting stung can result in painful swelling, and hornets aggressively guard their colonies. However, with proper preparation and correct technique, eliminating nests yourself is completely feasible.
In this article will walk you step-by-step through safe DIY process. With some background knowledge and the right approach, you can eliminate garden or home hornet nests without spending hundreds hiring pest control. We’ll also cover situations when it’s better to call pros and explore effective methods for various scenarios to rid your home of these uninvited guests. Let’s get started!
Why To Remove a Hornet Nest?
Eliminating a nest of hornets found at home is essential for several reasons, both to protect human health and preserve the integrity of buildings. Here’s a closer look at the dangers posed.
Threats to Human Health
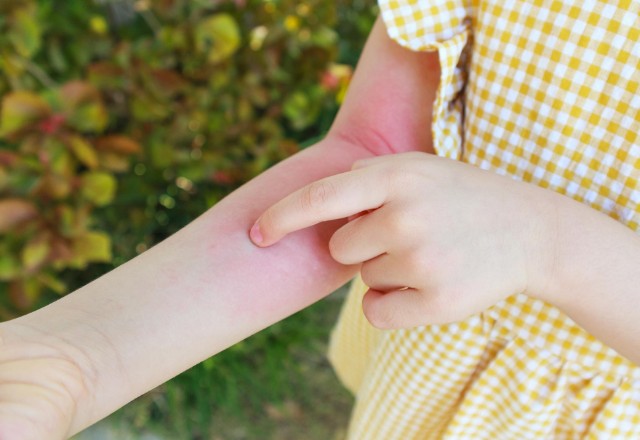
- Painful Stings and Allergic Reactions: Hornet sting can be extremely painful and potentially life-threatening, especially for individuals with allergies to stinging insects. Multiple stings increase the risk of severe reactions, including anaphylaxis.
- Increased Aggression: These insects can become highly aggressive if they perceive their nest is threatened, leading to attacks on humans within proximity. This aggression is particularly heightened during the late summer and early fall when their populations peak.
Threats to Buildings
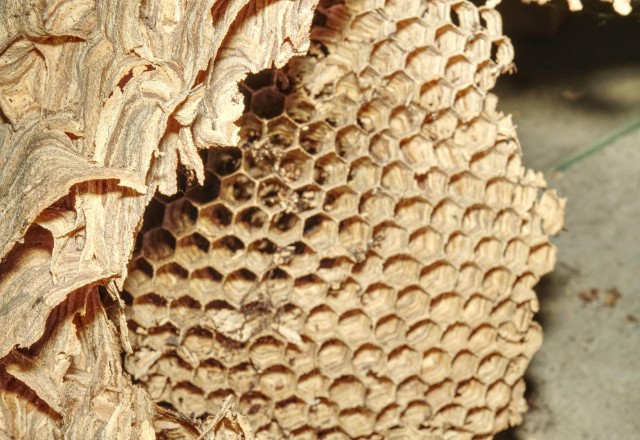
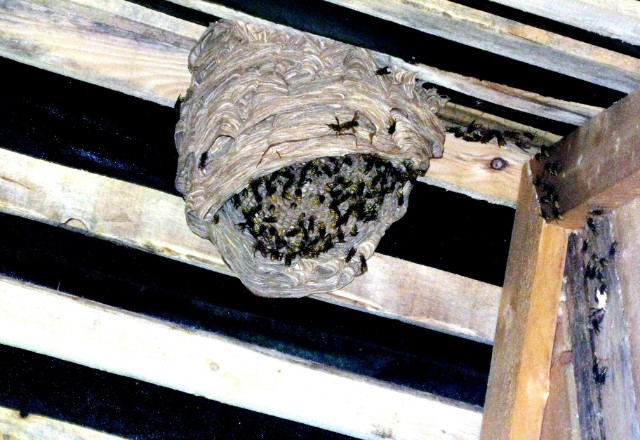
- Structural Damage: Hornet nests built within walls, in the attics or under roofs can cause structural damage over time. The weight of a large colony, combined with potential moisture issues from its presence, can weaken building materials.
- Attracting Additional Pests: Decomposing insect homes can attract other pests, including rodents and beetles, leading to further infestations.
- Blocked Vents and Chimneys: Insects houses constructed in vents or chimneys can block airflow and pose significant fire hazards, as well as ventilation issues for the building.
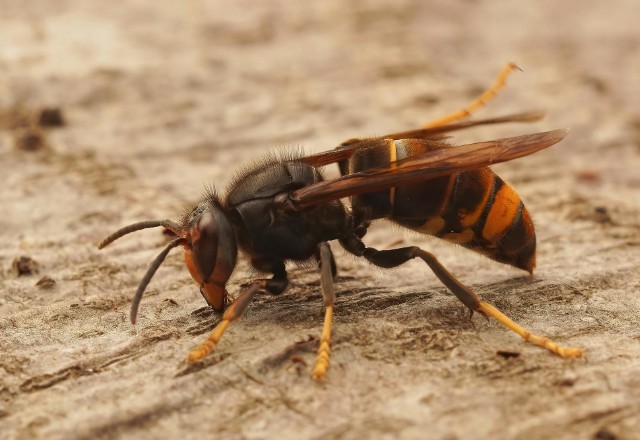
Given these risks, timely eliminating of the Northern Giant Hornet, European Hornet, Bald-faced hornet, Yellow Jackets and Paper Wasp nest is crucial to avoid harm to occupants and prevent damage to the structure. This task, however, must be approached with caution, keeping safety as the top priority.
WA residents can view the map of reported hornet sightings in Washington State and report to the Department of Agriculture if they believe they have seen a Northern giant hornet. Residents of other states should contact the Department of Agriculture in their own state to report sightings.
Methods To Remove Hornet Nests: DIY or Professional Help
There are two main approaches: undertaking the task yourself or enlisting the assistance of professionals. Each method has its own set of considerations, risks, and benefits. This section will help you navigate these options and decide the best course of action for your specific situation.
Clearing Out a Hornets Colony by Hand
What You Will Need For Remaval of Hornet Nest
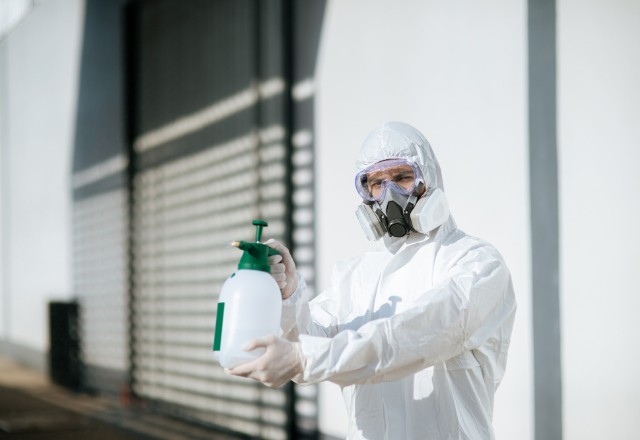
- Protective Clothing: Wear thick gloves, long sleeves, and pants, and ensure your face and neck are covered with a veil or hat with netting.
- Insecticide: Select an insecticide labeled for use against hornets.
- A Sealable Bag or Container: For safely disposing of their hive.
- A Ladder: If the colony is out of reach from the ground.

Best Time to Remove Hornet Nest and Why
- Time of Year: Late autumn or early spring is ideal because the colony population is smaller, and the insects are less aggressive.
- Time of Day: It’s better to reach the nest at night or early morning, as in the dark these insects are less active and most are inside the hive, reducing the risk of hornet stings.
Performing the procedure requires careful planning and execution. The following guidelines aim to maximize safety and effectiveness while minimizing the risks associated with this task.
How to Get Rid of Hornets Nests: General Steps
Prepare the Area: Ensure that the area around the colony is clear of pets and people. Inform anyone nearby about your plans to prevent accidental disturbances.
Plan Your Escape Route: Before approaching the hive, identify a clear and quick path to retreat in case the insects become aggressive.
Apply Insecticide: Follow the instructions on the insecticide label carefully. Typically, the best approach is to apply the insecticide directly to the hive’s entrance, where the insects are coming and going. Some products are designed to be sprayed from a distance, allowing for safer application.
Wait and Observe: After applying the insecticide, withdraw to a safe distance and observe. It may take several hours to a day for the insecticide to take full effect. Do not attempt to get rid of the hornet nest immediately.
Check for Activity: Before attempting to dispose it, check to ensure that there is no visible activity. This may mean waiting until the following day to confirm that the insects have been eradicated.
Take Down the Hive: Once you are certain the colony is inactive, wearing your protective gear, carefully take down their home. If it is attached to a branch or under eaves, it can usually be knocked down with a pole or by hand.
Seal and Dispose: Place it in a sealable bag or container, and dispose of it according to your local waste management guidelines.
Clean the Area: After the hive is taken away, clean the area where it hang, with soap and water to neutralize any remaining insecticide residue or pheromones that may attract other insects.
Monitor the Site: In the days following removal, keep an eye on the site for any signs of returning insects. Sometimes, a second treatment may be necessary if a new colony begins to form.
Essential Safety Precautions
It’s crucial to adhere to the following safety measures to minimize the risk of stings and ensure a safe removal process:
Wear Protective Clothing: Full coverage is vital for safe work. Use thick gloves, long sleeves, trousers, boots, and headgear with a face shield or netting to protect against stings.
Choose the Right Time: Conduct the removal during the night or early morning when these insects are less active, making the process safer.
Inform Others: Make sure household members and neighbors are aware of the removal process to keep them safe.
Have a Plan B: Always have an escape route planned out in case the hive’s inhabitants become agitated and you need to quickly leave the area.
Use Appropriate Insecticides: Select insecticides specifically designed for colony eradication, and follow the manufacturer’s instructions carefully.
Avoid Sudden Movements: Approach the hive slowly and steadily to avoid alarming the hornets.
Do Not Attempt Removal if Allergic: If you or anyone in your household is allergic to stings, do not attempt to perform the procedure yourself. Contact professionals.
Keep Children and Pets Inside: Ensure that children and pets are kept indoors and away from the area during and after the application of insecticides until it is safe.
By following these precautions, you can significantly reduce the risks and protect yourself and others from potential harm.

Emergency Actions If Things Go Awry During Hornet Nest Removal
Despite careful planning and precaution, unexpected situations can arise during the process. Here’s what to do if you encounter trouble:
1. Immediate Retreat: If the insects become aggressive, calmly but quickly leave the area via your pre-planned escape route. Do not make sudden movements or swat at the insects as this can provoke them further.
2. Seek Shelter: Enter a closed space as soon as possible, such as a house or a car, to distance yourself from the hornets.
3. Treat Stings Promptly: If stung, take out the stinger if visible, wash the area with soap and water, and apply a cold pack to reduce swelling. Over-the-counter pain relievers and antihistamines can help manage pain and itching.
4. Monitor for Allergic Reactions: Watch for signs of an allergic reaction, such as difficulty breathing, swelling of the face or mouth, or a rash spreading away from the sting site. If any of these symptoms occur, seek medical attention immediately.


5. Consult Professionals: If the situation becomes unmanageable or if there is significant risk of harm, it’s time to call in professional pest control services. They have the expertise and equipment to safely handle the situation.
6. Report the Incident: If you’ve used insecticides, report any adverse reactions (to humans or pets) to the Poison Control Center or seek medical advice.
7. Learn from the Experience: Review what went wrong and consider professional removal in future instances to avoid similar situations.
By being prepared for emergencies and knowing how to respond, you can protect yourself and others from potential harm during the nest removal process.
Garden vs. Under-Roof Colonies: Treatment Methods
The approach to hornest hive removal can significantly differ depending on the nest’s location, such as in a garden or under a roof. Each scenario presents unique challenges and considerations:
In the Garden:
- Accessibility: Colonies in gardens are often more accessible, but this doesn’t necessarily make them easier to deal with. The open environment means there’s less control over the situation, and there’s a higher risk of the insects attacking.
- Protection of Plant Life: When using insecticides, there’s a need to protect surrounding plant life from potential harm. Choose environmentally friendly options and apply them carefully to minimize impact.
- Visibility: It’s easier to monitor a hive in a garden for activity post-treatment, allowing for a more straightforward assessment of whether the removal has been successful.
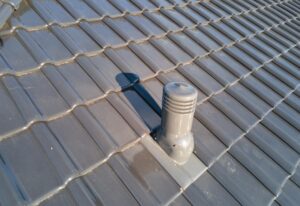
Under Roofs:
- Restricted Access: Hoenrts homes under roofs or in eaves are more challenging to access, requiring ladders or even removal of part of the roof or siding, which adds complexity and potential cost.
- Increased Risk to the Structure: There’s a risk of damage to the building, not just from the hive itself but also from the removal process, especially if it involves invasive methods.
- Containment of Insecticides: Dealing with attic infestations, when applying insecticides in confined spaces, there’s a greater need to be cautious about where the chemicals are going, as they can seep into living spaces.
Common Considerations:
- Safety First: Regardless of location, safety remains the primary concern. Protective clothing and careful planning are essential.
- Professional Assessment: Especially for colonies in challenging locations, consulting with a professional can provide tips into the safest and most effective removal strategies.
- Post-Removal Monitoring: After removal, it’s crucial to monitor the area for signs of new colonies. Regular inspections can help prevent future infestations.
Understanding these nuances ensures that regardless of where a hive is located, the removal process is conducted safely, effectively, and with minimal risk to both humans and the environment.
Average Cost of DIY Hornet Nest Removal Method
Embarking on a DIY journey to get rid of a colony involves certain costs, primarily for materials and equipment needed to safely and effectively carry out the task. On average, this method could cost around $70, with expenses allocated as follows:

- Protective Clothing: Approximately $30 for a set that includes a jacket, pants, gloves, and a hat with netting to protect against stings.
- Insecticide Spray: Around $15 for a can specifically designed to target these insects.
- Sealable Bags: $5 for a pack of heavy-duty bags suitable for the safe disposal of the nest.
- Ladder Rental: If a ladder is not already available, a daily rental may cost about $20.
The largest portion of the expense is likely to go towards purchasing protective clothing, which is essential for ensuring the remover’s safety from potential stings. While the cost of insecticide and disposal materials is relatively modest, investing in proper protective gear is crucial to prevent injuries during the eliminating process.
Once a nest is eliminated from your home’s infrastructure, it’s vital to have a professional inspection even following successful DIY process. While dislodging the nest, structural weaknesses in the building materials may be aggravated. Or hornets chewing through surfaces to expand nesting cavities could already have compromised stability.
Contact a roofer, siding repair company, or general contractor to perform an exam after cleanup. They will check for new moisture exposure, gaps around joints/seams, and areas needing sealant. If the nested surface feels spongy or rotting underfoot, further demolition and rebuilding of affected sections may be required. Catching damage early is crucial to avoid expensive roof repairs later.
Don’t neglect this inspection step simply because hornets have vacated. Permanent repairs ensure no ongoing issues nor renewed nest attraction at former infestation sites around your property’s vulnerable spots.

When to Call in the Professionals To Remove a Hornet Nest
Opting for professional assistance in removing a hornets colony offers several advantages, underscoring the importance of expertise in handling potentially dangerous situations. Here are key benefits and distinctions of professional methods:
- Expertise and Experience: Professionals possess deep knowledge of different species’ behaviors and can identify the most effective removal strategy.
- Safety: Specialists wear industrial-grade protective gear and use techniques that minimize the risk of stings or allergic reactions.
- Efficiency: With access to more potent insecticides and specialized equipment, professionals can address infestations more quickly and thoroughly.
- Preventive Measures: Beyond mere removal, professionals can offer advice and services to prevent future colonies.
- Legal Compliance: Certain areas have regulations regarding the handling of wildlife, including insects. Professionals ensure that removal practices comply with local laws.
- Guaranteed Results: Many pest control companies offer guarantees, promising a resolution to the problem or providing additional services at no extra cost if the first attempt doesn’t fully solve the issue.
- Comprehensive Assessment: Post-removal, experts can evaluate the structure for damage caused by the hive or the removal process, advising on necessary repairs to prevent future issues.
In summary, while DIY methods may seem cost-effective, the expertise, safety measures, and long-term effectiveness offered by professionals often outweigh initial savings. Their ability to diagnose and resolve issues comprehensively provides peace of mind and protects both your health and property.
Comparing the Costs: DIY vs. Professional Hornet Nest Removal
When deciding between a DIY approach and professional removal of a nest, understanding the cost implications of each method is crucial.
DIY Removal Costs: As previously outlined, the DIY approach to colony removal typically incurs a cost of around $70. This estimate includes the purchase of protective clothing, insecticide, sealable bags for disposal, and possibly renting a ladder. This method is more cost-effective upfront but lacks the guarantees and safety measures provided by professionals.
Professional Removal Costs: The cost for pest control expert services averages about $300-400 for basic removal from accessible outdoor locations. This price reflects the expertise, safety equipment, and specialized insecticides used by professionals. However, if the nest is concealed within a wall void or another difficult-to-access area, additional charges apply for accessing the hive and repairing any structural damage incurred during the process. This can significantly increase the total cost, depending on the complexity of the job and the extent of the repairs needed.
Concluding Thoughts
Removing a hornets colony on your own can be a feasible task under specific conditions and with the appropriate skills. If the nest is easily accessible, located outdoors, and not in close proximity to high-traffic areas, a well-prepared homeowner can undertake the removal process using the right protective gear, insecticides, and following safety protocols meticulously. This approach can be cost-effective and provide immediate resolution to the problem.
However, the importance of recognizing one’s limits cannot be overstressed. Situations involving nests in complex locations, such as within walls, chimneys, vents or anywhere else high up on a building (10 feet high and up), not only present heightened risks but may also require specialized tools and knowledge for safe and effective removal. Additionally, certain species may exhibit aggressive behaviors that increase the danger of DIY attempts.
In essence, while DIY nest removal is within the realm of possibility for the well-informed and cautious individual, the decision to proceed should always be tempered with a realistic assessment of the risks involved. When in doubt, or when faced with potentially hazardous situations, the value of professional expertise and the safety it brings to the process far outweighs the cost. Making informed decisions based on the nest’s location, the homeowner’s ability to safely address the issue, and the potential need for structural repairs post-removal will ensure the well-being of all involved and the integrity of the property.