509-201-4190

Table of Contents
Having screw holes in your metal roof can be a real headache. Even the smallest hole can lead to leaks, which can cause major damage to your home or building. That’s why it’s so important to patch those pesky holes as soon as you notice them. In this guide, we’ll walk you through the entire process step-by-step, so you can kiss those leaks goodbye for good.
We’ll cover everything from gathering the right materials to the actual patching process and some handy maintenance tips. By the end of this article, you’ll be a pro at patching screw holes in metal roofs. Let’s get started!
Materials Needed
Before we dive into the nitty-gritty of patching those holes, let’s make sure you have all the necessary materials on hand. Here’s a list of what you’ll need:
Sealants and Caulks
Choose roof sealant or caulk (silicone or polyurethane-based). Recommended products:
- Liquid Nails LN-601 Sealant – This high-quality polyurethane sealant is designed specifically for metal roofs and provides long-lasting protection against leaks. Available at Home Depot.
- Geocel 4500 Roof Caulk – A versatile and durable polyurethane caulk that can be used for patching screw holes and sealing various roofing applications. Available at Lowe’s.
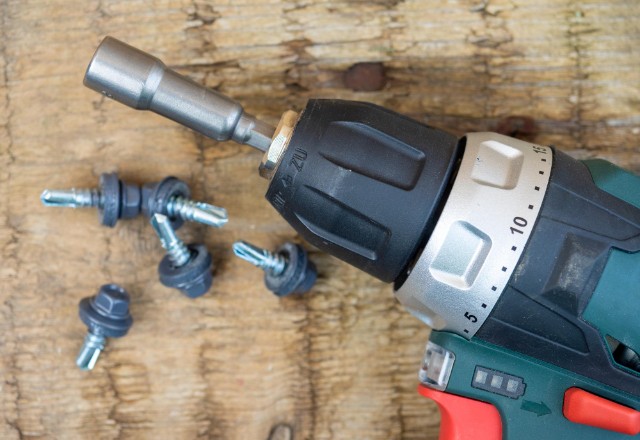
Screws and Washers
- Replacement screws (same size and type as your existing roof screws)
- Rubber washers or grommets (if needed)
Tools
- Caulking gun
- Putty knife or spatula
- Wire brush or sandpaper
- Rags or paper towels
- Ladder or stable platform (if needed)
Safety Gear
- Gloves
- Safety glasses
- Non-slip shoes or boots
Having the right materials on hand will make the job much easier and ensure a proper seal around those pesky screw holes.
Now that you have everything you need, let’s move on to the preparation stage.

Preparation
Before you start patching those screw holes on a metal roof, it’s important to prepare the area properly. Here’s what you need to do:
Step 1: Clean the Area Around the Screw Holes
Grab a wire brush or some sandpaper and gently remove any rust, dirt, or debris around the holes. This will help the sealant or caulk adhere better to the metal surface.
Step 2: Remove Any Loose or Damaged Materials
If there are any loose or damaged pieces of metal or sealant around the holes, carefully remove them. You want to start with a clean slate.
Step 3: Inspect the Surrounding Area
Take a close look at the area surrounding the screw holes. Check for any additional damage, such as cracks or corrosion. If you find any, you may need to address those issues before patching the holes.
Patching the Screw Holes
Now that the area is prepped and ready to go, it’s time to start patching those pesky holes. Follow these steps carefully:
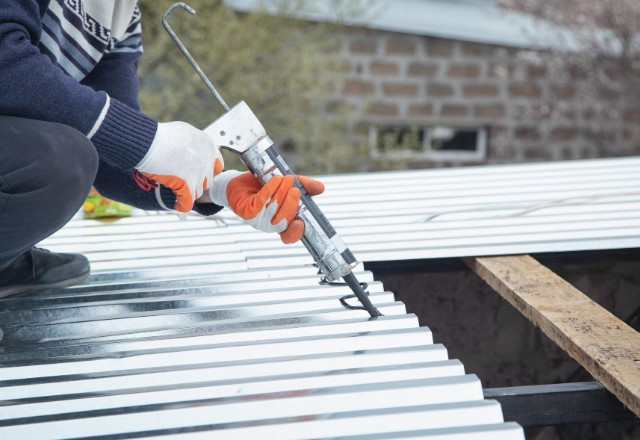
Step 1: Apply Sealant or Caulk to the Screw Holes
Using your caulking gun, apply a generous amount of sealant or caulk directly into the screw holes. Make sure to fill them, but avoid overfilling.
Step 2: Insert Rubber Washers or Grommets (if necessary)
If your roofing system requires rubber washers or grommets, insert them into the holes now, on top of the sealant or caulk.
Step 3: Secure the Patch with New Screws
Grab your replacement screws and secure the patch by screwing them into the holes, through the washers or grommets (if used).
Step 4: Seal the Edges of the Patch
Once the screws are in place, apply an additional layer of sealant or caulk around the edges of the patch. This will create a watertight seal and prevent any future leaks.
Finishing Touches
You’re almost done! Just a few more steps to ensure a proper and long-lasting patch:
Step 1: Inspect the Patched Area
Take a close look at the patched area and check for any gaps or potential leaks. If you spot any, don’t worry – you can easily fix them.
Step 2: Apply Additional Sealant or Caulk if Needed
If you find any gaps or potential leak points, simply apply some more sealant or caulk to those areas.
Step 3: Clean Up the Area
Once you’re satisfied with the patch, grab those rags or paper towels and clean up any excess sealant or debris around the area.
Maintenance and Prevention
Patching screw holes is just one part of maintaining a healthy metal roof. Here are some tips to keep your roof in top shape:
- Inspect your roof regularly (at least once a year) and look for any new screw holes, cracks, or damage.
- Trim back any overhanging trees or branches that could potentially damage your roof.
- Consider re-sealing or re-coating your entire roof every 5-10 years, depending on the manufacturer’s recommendations.
- If you notice any major issues or extensive damage, don’t hesitate to call a professional roofing contractor.
Expert Tips and Tricks
To help you become a true metal roof patching pro, here are some expert tips and tricks from experienced roofers:
- Use a high-quality, flexible sealant or caulk designed specifically for metal roofs. Cheaper options may not provide a lasting seal.
- Apply sealant or caulk in dry, warm weather conditions for best adhesion.
- For larger holes, consider using a metal patch or flashing before sealing with caulk or sealant.
- Avoid over-tightening screws, as this can cause additional damage or holes in the metal.
- If you’re unsure about your ability to properly patch the holes, don’t hesitate to hire a professional. Improper patching can lead to bigger problems down the road.
By following these steps, tips, and tricks, you’ll be well on your way to a leak-free, properly patched metal roof. Don’t let those pesky screw holes ruin your day – tackle them head-on and enjoy a dry, secure roof for years to come.
FAQs
What's the best sealant or caulk to use for patching screw holes in metal roofs?
How long will the patches on my metal roof last?
Can I patch larger holes or cracks in my metal roof myself?
How do I know if it's time to replace my entire metal roof instead of just patching?
Will patching the screw holes affect the warranty on my metal roof?
Conclusion
Patching screw holes in your metal roof may seem like a daunting task, but with the right materials, preparation, and proper technique, it’s a job any homeowner can tackle. By following the step-by-step guide outlined in this article, you’ll be able to seal those pesky holes and prevent costly water damage to your home or building.
Remember, the key to a successful patch job is using high-quality sealants or caulks designed for metal roofing, cleaning the area thoroughly, and applying the products correctly. With a little elbow grease and attention to detail, you can extend the life of your metal roof and avoid the expense of a full replacement.
We hope this guide has provided you with all the information you need to confidently patch those screw holes in your metal roof. If you have any additional questions or experiences to share, feel free to ask them in the form below.
Any roof issues?
Our experts can provide a free consultation and advice on the best solution
Call us at