509-201-4190

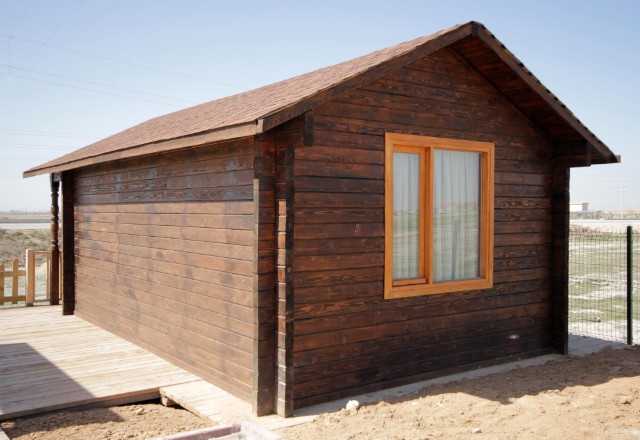
When it comes to improving the look and value of your home, one of the best investments you can make is installing wood siding. Not only does it add a classic charm to any home, but it also offers superior protection against inclement weather. However, installing wood siding isn’t always an easy DIY job. To make sure that your project goes smoothly and looks its best, here are some tips and tricks from the pros to help you get the job done right.
Disclaimer: This article is provided for informational purposes only and should not be construed as professional advice. It is important to consult with a qualified contractor before starting any wood siding installation project. If you have questions about your specific situation, we recommend that you contact the experts at Advance Roofing LLC. They have been proudly serving the Spokane, WA area with the highest standards of quality roofing solutions for many years and are always happy to help. With their expertise and guidance, you can ensure that your siding installation job will be done right the first time.
What is Wood Siding?
Wood siding is a classic and traditional form of exterior cladding for homes and buildings. It is a natural material that has been used for centuries, providing protection and beauty to structures. Wood siding can come in a variety of sizes, styles, textures, and wood species, making it a versatile option for many design styles. Common types of wood siding include lap siding, board and batten, shingles and shakes, and vertical siding.
Wood siding also has the benefit of being a renewable resource, making it an environmentally friendly choice for those who prioritize sustainability in their building projects. However, it is important to note that proper installation and maintenance are crucial in ensuring the longevity and performance of wood siding. This includes addressing issues such as moisture management, proper ventilation, and regular cleaning and treatment to prevent decay and pest infestations.
Overall, wood siding is a beautiful and versatile option for those looking to add warmth and character to their homes or buildings. With proper installation and maintenance, it can provide long-lasting protection and beauty.
Why Choose Wood Siding?

Wood siding has been a popular choice for many homeowners for a variety of reasons. Not only is it an attractive and versatile option for exterior surfaces, but it also boasts some unique benefits that are hard to match with other siding materials.
- One of the biggest appeals of wood siding is its natural beauty. The natural grain and texture of wood add warmth and character to a home’s exterior, creating a timeless and classic look. More importantly, wood siding offers a diverse array of options that can easily be customized to fit the unique style and aesthetic preferences of any homeowner. From traditional cedar shake to modern vertical siding, wood siding can be applied in a variety of patterns and finishes to achieve a look that is truly one-of-a-kind.
- Another advantage of wood siding is its durability. When properly installed and maintained, wood siding can last for decades. It is also relatively easy to repair or replace any damaged or rotten boards, making it a cost-effective and long-lasting investment in a home’s exterior.
- Additionally, wood siding is an eco-friendly option for those who value sustainable building practices. It is a renewable resource that can be sustainably harvested and replenished, making it a responsible and environmentally conscious choice for homeowners who wish to reduce their carbon footprint.
It is important to note, however, that proper installation and maintenance are crucial in ensuring the longevity and performance of wood siding. This includes addressing issues such as moisture management, proper ventilation, and regular cleaning and treatment to prevent decay and pest infestations.
Despite these maintenance requirements, wood siding remains an attractive and viable option for homeowners who prioritize natural materials, durability, and customization options in their exterior siding. With its unique benefits and timeless beauty, it’s easy to see why wood siding continues to be a popular choice for homeowners.
Preparation
Before you start the actual installation process, it is important to properly prepare the area and materials that will be used for your wood siding project. Taking the time to prepare and plan ahead can save you a lot of time and headache down the line.
One of the first steps in preparing for wood siding installation is to gather all the necessary materials and tools. This includes your wood siding planks, nails, saws, utility knife, measuring tape, bubble level, and other equipment.
Next, it is essential to properly prepare the surface that the siding will be attached to. This includes removing any loose paint, dirt, or debris from the area. If there is any existing siding, it may need to be removed before new siding can be installed. It is also important to check for and replace any rotten boards or other damaged materials.
In addition to the surface preparation, it is important to address any moisture issues. Wood siding is susceptible to water damage and rot if it is not properly protected. This includes installing a water-resistive barrier, such as felt or house wrap, to prevent water infiltration and provide additional protection.
Preparing the wood siding itself is also important. This includes inspecting the planks for any defects or damages and sealing the edges with primer or sealant. Properly sealing the edges of the wood siding can help prevent moisture from penetrating the material and causing premature decay.
Planning and preparation are crucial steps in ensuring a successful wood siding installation. By taking the time to properly prepare the area and materials, you can help ensure the longevity and performance of your wood siding for years to come.
Tools and Materials Needed

When it comes to installing wood siding, having the right tools and materials is crucial to the success of the project. Here are some of the key materials and tools you will need:
- Wood Siding Planks: Wood siding comes in a variety of materials, such as cedar or pine. When choosing your wood siding, select a species that is durable and well-suited to your climate.
- Nails: Ring-shank nails are typically used for wood siding installation, as they provide a strong hold and are resistant to withdrawal.
- Saws: A circular saw or miter saw can be used to cut the wood siding planks to the correct length.
- Utility Knife: A utility knife can be used to score and cut the wood siding, as well as to trim off any excess material.
- Measuring Tape: A measuring tape is essential for ensuring accurate cuts and placement of the wood siding.
- Bubble Level: A bubble level can be used to ensure that the wood siding is being installed horizontally and vertically.
- Hammer or Nail Gun: A hammer or nail gun can be used to attach the wood siding planks to the house sheathing.
- Moisture Barrier: A water-resistive barrier, such as felt or house wrap, is important to prevent water infiltration and provide additional protection.
- Corner Board: A corner board can be used to create a finished look at the corners of your home.
- Expansion Joints: Expansion joints should be placed every 12-16 feet to allow for natural expansion and contraction of the wood siding.
- Furring Strips: Diagonal furring strips can be used to create a flat surface for the wood siding to be attached to, if needed.
With the right tools and materials, you can tackle your wood siding installation project with confidence. Remember to properly prepare the surface, protect against moisture, and take the necessary precautions to ensure a successful installation.
Clean the Exterior Walls: Tips and Tricks from the Pros
The exterior walls of your home are constantly exposed to the elements, which means they are prone to accumulating dirt, grime, and other types of debris. To keep your home’s exterior looking its best, it’s important to clean the walls on a regular basis. Here are some tips and tricks from the pros:
Assess the Condition of Your Walls
Before you begin cleaning, inspect the walls to determine how much dirt and grime has accumulated and what type of cleaning solution is best suited for the job. Walls that have been painted or covered with some other type of coating may require more care than untreated walls.
Choose the Right Cleaning Solution
There are a variety of cleaning solutions available for cleaning exterior walls. Some of the most common include pressure washing, using a garden hose, or using a cleaning solution specifically designed for exterior surfaces. It’s important to choose the right solution for your particular siding material, such as wood, vinyl, or brick.
Safety First
Cleaning exterior walls can be a hazardous task, especially if you’re working at heights. Be sure to wear safety equipment such as a hard hat, eye protection, and non-slip shoes. Additionally, be sure to use safe cleaning techniques such as using a ladder or lift if necessary.
Remove Loose Debris
Before applying any cleaning solutions, use a soft-bristle brush or broom to remove any loose debris such as leaves or cobwebs from the walls. This will help ensure that the cleaning solution can penetrate the surface of the walls without anything impeding its effectiveness.
Test the Solution
Before applying a cleaning solution, test it on a small, inconspicuous area of the wall first. This will help you determine if it’s safe to use on the entire surface of the wall without causing damage.
Apply the Solution
Once you’ve determined that the cleaning solution is safe and effective, apply it to the walls using a soft-bristled brush or spray bottle. It’s essential to apply the solution evenly to ensure that all areas of the wall are being cleaned.
Rinse and Dry Thoroughly
After applying the cleaning solution to the walls, be sure to rinse it off completely with a garden hose or pressure washer. Once you’ve rinsed the walls, use a clean cloth or towel to dry them thoroughly.
In conclusion, cleaning the exterior walls of your home is an important maintenance task that should be done on a regular basis. By following these tips and applying the appropriate cleaning solution, you can help maintain the appearance and value of your home for years to come.
Measure the Area for Installation

When it comes to installing wood siding, one of the most important steps is measuring the area where it will be installed. Proper measurements will ensure that you purchase the right amount of materials and that the installation process goes smoothly. Here are some tips and tricks from the pros for measuring the area for wood siding installation:
- Record the Square Footage
The first step in measuring the area is to determine the square footage of the wall surface. Start by measuring the width and height of each wall in feet. Multiply the width and height measurements together to get the square footage of each wall. Add the square footage of all the walls together to get the total square footage of the area.
- Consider Additional Protection
When measuring, keep in mind any additional protection that may be necessary, such as a moisture barrier or furring strips. These will add to the overall thickness of the wall and must be included in your measurements to ensure that the siding fits properly.
- Account for Windows and Doors
Don’t forget to account for the square footage of any windows and doors in the area. Measure the width and height of each opening and subtract the total square footage of the openings from the total square footage of the area.
- Account for Siding Laps
When installing wood siding, it’s common to overlap each board with the one above it.
This overlap is known as a lap and must be accounted for in your measurements to ensure that you purchase the right amount of siding. The size of the lap will depend on the type of siding being installed, so be sure to check with the manufacturer for specifications.
- Consider Siding Waste
Finally, when ordering wood siding, it’s a good idea to order a little extra to account for waste. Roughly 10% extra is recommended to cover any mistakes or trimming that may be necessary during installation.
Measuring the area for wood siding installation may seem like a daunting task, but with these tips and tricks from the pros, you can ensure that your siding project goes off without a hitch. Taking the time to measure properly will save you time and money in the long run, and will ensure that your home’s exterior looks great for years to come.
Cut Trim Pieces to Fit
Cutting trim pieces to fit is an essential part of installing wood siding. Trim pieces are typically used to cover gaps between siding boards and where the siding meets windows, doors, and corners. To ensure a professional-looking installation, it’s critical to cut trim pieces to fit precisely.
The tools required to cut trim pieces include a utility knife or saw, measuring tape, and a square tool. Always wear protective gloves and eyewear when cutting the trim pieces.
- To begin, measure the area where the trim piece will be installed. It’s best to measure twice to ensure accuracy. Use the square tool to mark the area where the trim piece will be cut. This will ensure a straight cut.
- Next, cut the trim piece to fit the measured area. If using a utility knife, score the trim piece along the marked line until it’s deep enough to break. If using a saw, line up the blade with the marked line and make the cut. Be sure to cut the trim piece slightly longer than needed, as it can be trimmed again later if necessary.
- Once the trim piece is cut, test and fit it into the area where it will be installed. Trim off any excess material with a utility knife or saw until the trim piece fits snugly into place. It’s important to ensure that the trim piece doesn’t sit too tightly or too loosely against the siding or the wall surface.
It’s always best to cut the trim pieces slightly larger than necessary. This will allow for a more seamless installation and will give the trim piece a professional look. It’s important to take your time when cutting trim pieces to ensure that they fit perfectly and provide additional protection against water infiltration.
Installing the Wood Siding
Installing wood siding is a beautiful and timeless way to add curb appeal and protection to your home’s exterior. However, it’s important to know the proper techniques and tools to ensure a successful and long-lasting installation. Here are some tips and tricks from the pros on how to install wood siding.
Determine the Placement of Boards
When it comes to installing wood siding, one of the most important aspects to consider is the placement of the boards. The way in which you position the boards will not only affect the overall appearance of your siding, but it will also determine how well it performs over time.
The first thing you need to consider is the type of siding you will be using. If you are installing lap siding, the boards will overlap each other horizontally. On the other hand, if you are using vertical siding, the boards will be positioned vertically.
Next, you need to decide on the width of the boards. This will vary depending on your personal preference and the look you are trying to achieve. Wider boards will create a more rustic, traditional look, while narrower boards will give a more modern, streamlined appearance.
Once you have determined the type and width of the boards, you will need to plan their placement. Start at the bottom of the wall and work your way up. For horizontal lap siding, begin by installing a starter strip at the bottom of the wall. This will ensure that the first course of siding is level.
For vertical siding, you may need to install vertical furring strips to create a level surface. These strips should be placed at equal intervals along the wall, usually every 16-24 inches.
When installing the siding boards, it is important to leave a small gap between each board to allow for expansion and contraction. This is especially important in regions with fluctuating temperatures or high humidity levels.
Another consideration when determining the placement of boards is the presence of windows, doors, and corners. These areas may require special attention to create a cohesive look. For example, you may need to install corner boards to create a seamless transition between the siding on adjacent walls.
In conclusion, determining the placement of boards is a crucial step in the wood siding installation process. Proper planning and attention to detail will ensure a beautiful and long-lasting finished product.
Begin Installing from the Bottom Up
One crucial tip when installing wood siding is to begin from the bottom up. This may seem like a no-brainer, but it is an important point to emphasize because starting from the top down can cause numerous problems.
When you begin from the top, you risk having water infiltrate the seams between the boards and get trapped behind them. This can lead to mold growth, rotting boards, and other issues. Starting from the bottom ensures that any water that seeps in can drain away.
Additionally, starting from the bottom allows you to create level courses of siding. If you start from the top, it is more difficult to ensure that each course is level and properly aligned. By beginning at the bottom, you can use a starter strip to ensure the first course is completely level and straight.
To begin installing from the bottom up, first attach the starter strip to the bottom of the wall. This strip serves as a guide for the rest of the siding, so it is important to make sure it is completely level. If your wall surface is not even, you may need to add vertical furring strips to create a flat surface.
Next, install the siding boards one by one, making sure to leave a small gap between each one for expansion and contraction. If you are using lap siding, make sure the upper board overlaps the lower board to protect the wall surface and wall cavity from moisture. If you are using vertical siding, make sure each board is securely fastened to the furring strips.
It is also important to pay attention to the placement of windows, doors, and corners when installing siding. These areas may require added attention to ensure a seamless and cohesive look. Consider using corner boards and trim pieces to create a finished appearance.
By beginning from the bottom and carefully planning the placement of each board, you can ensure a secure and visually appealing installation of wood siding.
Secure the Boards with Nails
Once you have positioned the boards in place and ensured that they are leveled, it is time to secure them with nails. Choosing the right type of nails is essential to ensure that the siding boards remain in place for a long time without getting damaged.
Ring-shank nails are considered to be ideal for securing wood siding. These nails have a textured, ridged surface that provides superior holding power compared to plain nails.
They are designed to resist pulling out, making them the perfect choice for exterior siding jobs.
When fastening the boards, it is important to follow the building code requirements for the spacing and placement of the nails. You will need to space the nails approximately 16 inches apart, and closer together at the ends of the boards.
To ensure a consistent spacing pattern, consider using a nail gun with a depth control feature. This will allow you to set the nail to the perfect depth, preventing it from breaking through the surface of the board and causing damage.
Another important aspect to keep in mind is that the nails should be driven at an angle. This will help prevent water from seeping in between the boards and causing rot. Angle the nail in the direction of the wood grain at about a 45-degree angle.
It is also important to keep the nails away from the edges of the boards. This helps prevent the siding from splitting or cracking, which can lead to water infiltration and damage to the underlying structure.
Remember to choose nails made of a corrosion-resistant material such as stainless steel or hot-dipped galvanized steel. This will help prevent rust and ensure the longevity of the siding boards.
Properly securing the siding boards with nails is an essential step in the wood siding installation process. Following these tips and using the right tools and materials can help ensure that your siding job is secure and long-lasting.
Repeat for Each Row of Boards
When installing wood siding, one of the important steps is to ensure that each row of boards are installed consistently. This not only enhances the overall appearance of the exterior surface, but it also helps to maintain the structural integrity of the siding.
To achieve this consistency, it is recommended to use a level to ensure that each board is installed straight and even. Begin by fastening the first row of boards to the house sheathing or diagonal furring strips. Use a bubble level to ensure that the boards are level and plumb.
Once the first row is secured, repeat the process for each subsequent row. Begin by trimming the first board of each row to the desired length, ensuring that it overlaps the previous row by at least one inch. This helps to provide additional protection against water infiltration.
Next, fasten the board to the wall surface, ensuring that it is level and horizontally aligned with the bottom edge of the previous row. Use a nail gun or hammer and ring-shank nails to secure the board at the required spacing intervals, and follow the building code requirements for the placement of the nails.
Repeat this process for each subsequent board in the row, ensuring that they overlap by at least one inch and are secured at the same spacing intervals. Once the row is complete, use a level to ensure that it is straight and even.
Repeat this process for each row of boards, ensuring that they are installed consistently and evenly. This will help prevent improper installations, loose boards, and water infiltration, which can lead to rotten boards and costly repairs.
In addition, for vertical sidings, the process is similar, but it is important to begin at the corner of the house with a corner board, and then install the vertical strips at the required spacing intervals. Beveled siding and cedar lap siding are also popular choices for exterior siding projects and may require additional steps for proper installation.
Remember to consult the manufacturer’s instructions for your specific siding type, and always follow the building code requirements for a safe and high-quality installation. With these tips and tricks from the pros, you’ll be able to install wood siding like a true expert.
Finishing Touches for a Professional Look
When it comes to installing wood siding, the finishing touches can make all the difference in achieving a professional and polished look. Here are some tips and tricks from the pros on how to finish your siding job with finesse:
- Trim pieces: Trim pieces are the small details that can give your siding job a refined look. They can be used to cover up unsightly gaps where the siding meets other surfaces such as windows, doors, or corners. There are a variety of trim pieces available, from simple corner pieces to ornate moldings, so choose the ones that best fit your siding type and style.
- Paint and stain: To protect your wood siding and maintain its appearance, it’s essential to use high-quality paint or stain. The right color and finish can not only enhance the beauty of your siding but also provide additional protection against the elements. Make sure to choose a product that is specifically designed for exterior wood surfaces and follow the manufacturer’s instructions for application.
- Sealing and caulking: Sealing and caulking are critical steps in ensuring a watertight seal between your siding and other surfaces. This is especially important for areas where water penetration could cause damage or rot. Use a moisture barrier or flashing tape to seal any gaps, and apply a quality exterior caulk to seal around windows, doors, and other openings.
- Cleaning up: Once your siding job is complete, it’s essential to clean up any debris or excess materials. Use a utility knife or saw to trim any loose ends or overhanging pieces, and remove any loose paint or debris. A pressure washer or garden hose can be used to rinse off any dirt or dust that may have accumulated during the installation process.
By paying attention to the little details and taking the time to finish your wood siding job properly, you can ensure a clean, professional look that will last for years to come.
Whether you choose trim pieces, paint, sealing, or cleaning up, putting in the extra effort will be well worth it in the end.
Install Corner Posts for Vertical Sidings

Installing corner posts is a crucial step in any vertical siding installation project. The corner posts provide stability and support to the siding material, ensuring that it stays in place even during extreme weather conditions. Here are some tips and tricks from the pros to help you install corner posts for your vertical sidings correctly:
- Choose the right material: When selecting corner posts, it is essential to choose the right material that matches your vertical siding. Wood corner posts are the most popular option as they blend naturally with wooden board and batten or cedar lap siding. Vinyl and fiber-cement corner posts may be available for specific siding types.
- Measure and cut: Accurately measure the height and width of the corner where the posts will be installed. Cut the corner posts to the correct length using a saw or a pair of snips if you’re using vinyl.
- Install furring strips: Before installing the corner posts, create an even surface for them. Using diagonal furring strips, install them every 16 inches up and down the corner’s vertical plane. This will provide a nailing surface for the corner posts, making them secure.
- Attach the corner posts: Position the corner posts on the furring strips and nail them to the sheathing and framing behind the wall with ring-shank nails. Use a bubble level to ensure they are vertically straight.
- Finish the corners: Finish installing the vertical siding on the corner around the corner post. Use a saw to cut off any siding overlapping the corner post, and install trim pieces over any unattractive gaps.
- Add expansion joints: It is crucial to incorporate expansion joints when installing corner posts, especially for larger buildings. Follow the building code to determine if these joints are required.
In summary, correctly installing corner posts for vertical sidings can be a challenging and time-consuming task. However, by following these simple tips and tricks from the pros, you’ll be sure to get the job done right. Always choose the correct material, measure and cut accurately, install furring strips, attach the corner posts, finish corners with trim pieces, and incorporate expansion joints if necessary. With these techniques in mind, you’ll complete a professional-looking siding project in no time.
Check that All Pieces are Level and Securely Fastened
When it comes to installing wood siding, it is essential to ensure that each piece is level and securely fastened in place. This not only ensures a polished appearance but also protects against water infiltration, which can cause damage to your home’s structure.
Before starting your siding project, it’s important to have the right tools on hand. A bubble level, circular saw, nail gun, and utility knife are just a few of the essential tools that you’ll need to get the job done right.
Once you’ve gathered the necessary tools, it’s time to start the installation process. Begin with a layer of moisture barrier, which will protect the wall cavity from water infiltration.
This is especially important if you live in a rainy climate.
Next, start installing the siding boards. As you go along, use your bubble level to check that each piece is perfectly level. It’s also important to make sure that each piece is securely fastened to the house sheathing with the appropriate nails or screws.
If you notice a piece that is not level or does not appear to be securely fastened, it’s important to address the issue as soon as possible. If left unresolved, an improperly installed piece of siding can cause further damage to your home’s structure and lead to costly repairs down the line.
Be sure to also pay special attention to the corners of your home. These areas require extra attention to ensure that the siding is installed flush and that all pieces are level and secure. Adding corner boards and trim pieces can help to provide a finished look and ensure that the siding remains in place for years to come.
Conclusion
In conclusion, installing wood siding can seem like a daunting task, but with the right tools and a little bit of know-how, it can be a manageable DIY project. It’s important to take the time to properly prepare your surface and ensure that each piece of siding is installed correctly to prevent damage and costly repairs in the future.
When choosing your siding material, consider factors such as the climate and the specific look you’re trying to achieve. Cedar lap siding and beveled siding are popular choices for their natural look and durability.
While it may be tempting to cut corners and rush through the installation process, taking the time to do it right the first time will save you time and money in the long run. Improper installations can lead to water infiltration, rotten boards, and the need for costly repairs.
By following these tips and tricks from the pros, you can achieve a beautiful and long- lasting exterior siding job on your home. Remember to always follow building codes and safety guidelines while working on your home.