509-201-4190

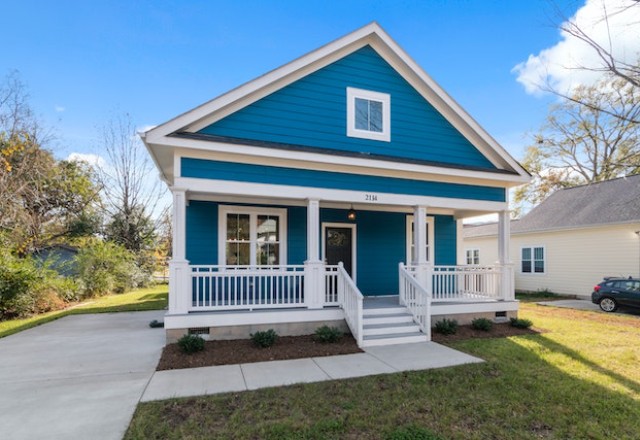
The look of your home’s exterior is essential to creating an inviting atmosphere and adding curb appeal. Hardie Plank siding is a popular choice for homeowners, as it provides long-lasting durability and a timeless look that won’t go out of style. Installing Hardie Plank siding can seem intimidating, but with the right tips and tricks, you can achieve a flawless finish. So if you’re ready to tackle this DIY project, read on to learn everything you need to know about Hardie plank siding installation!
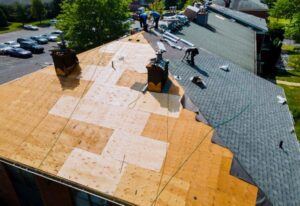
Disclaimer: The tips and tricks provided in this article are meant to serve as general guidelines for Hardie Plank siding installation. We recommend that you consult a professional before beginning any work on your home, as some techniques may vary depending on the region or type of home. With many years of experience in the Spokane, WA area providing high-quality roofing solutions, they can help you achieve the beautiful finish you desire with your Hardie Plank siding installation.
What is Hardie Plank Siding?
Hardie Plank siding is a type of exterior cladding that is made from a combination of cement, sand, and cellulose fibers. It’s designed to be durable, long-lasting, and resistant to fire, wind, pests, and other forms of damage. Plus, it has an aesthetically pleasing appearance that can give your home an updated look. Best of all, this type of siding is relatively easy to maintain; simply wash it off with a hose occasionally and you’re good to go! With its durability and timeless look, Hardie Plank siding can be the perfect choice for your home’s exterior.
Advantages of Installing Hardie Plank Siding
Installing Hardie Plank siding on your home can provide a number of advantages.
- For starters, it’s incredibly durable and will protect your home from wind, fire, pests, and other forms of damage.
- Plus, it’s low-maintenance – simply wash it off with a hose occasionally and you’re good to go!
- You’ll also save energy by using Hardie Plank siding since it provides superior insulation compared to traditional wood siding.
- And last but not least, this type of siding can give your home an updated look with its aesthetically pleasing appearance.
All in all, Hardie Plank siding is an excellent choice for any homeowner looking to upgrade their exterior!
Preparing for Installation
Prepping for Hardie Plank siding installation is an important step that should not be overlooked. To get started, inspect the surface of your home to ensure it’s in good condition and free of any rot or damage. Once you’ve confirmed the surface is ready for installation, make sure you have all the necessary tools on hand including a drill, saw, caulking gun, and measuring tape. Additionally, you’ll need to purchase Hardie Plank siding panels and other materials like nails and screws. Finally, be sure to read all the instructions provided by the manufacturer to familiarize yourself with their recommended installation techniques. With these tips in mind, you can prepare for a successful Hardie Plank installation!
Gather Materials and Tools Needed
Before you start your Hardie Plank siding installation project, it’s important to gather all the necessary materials and tools.
- Make sure you have the appropriate type of Hardie Plank siding panels for your specific project, as well as nails or screws, caulk, a drill, saw and measuring tape.
- Additionally, consider purchasing additional supplies such as a utility knife, protective eyewear and gloves.
- Finally, make sure you have enough time and energy to complete the project – this is especially important if you’re tackling the installation on your own.
With these tips in mind, you can be sure that your Hardie Plank siding installation goes off without a hitch!
Inspect Walls and Foundation
Before beginning your Hardie Plank siding installation, it’s important to inspect the walls and foundation of the area where you’ll be working. Make sure that the walls are in good condition, without any gaps or cracks. Also, check for any damage or deterioration on the foundation that could affect the stability of your siding. Additionally, make sure that any trim pieces are in good condition and there is no existing debris or vegetation that could interfere with the siding installation. With these tips in mind, you can be sure that your project goes off without a hitch!
Remove Existing Siding (if necessary)
Removing existing siding, if necessary, is an important part of a Hardie Plank siding installation. Before beginning your project, determine if the existing siding needs to be removed. If it does need to be removed, you’ll need to carefully pry away any nails or screws from the wall and use a crowbar or other appropriate tool to remove the old siding. Make sure that all of the existing material is properly disposed of and that the area is cleaned before starting your new siding installation. When removing existing siding, take special care not to damage any underlying materials or structures as this could affect the quality and longevity of your new Hardie Plank siding installation.
Installation Process
The installation process for Hardie Plank siding is relatively straightforward and can be completed in a few simple steps.
- Start by measuring the space where you plan to install the siding and then cut the panels to size using a jigsaw or circular saw.
- Once your panels are cut, use roofing nails or screws to attach them to the wall, making sure they are properly secured.
- When installing Hardie Plank siding, be sure to leave a gap of at least 1/8 inch between each panel for expansion and contraction.
- Finish up your installation by sealing around edges with caulk and painting or staining as desired. With these easy steps, you’ll have a beautiful, long-lasting siding that will add value and curb appeal to your home.
The installation of Hardie Plank siding is a simple process that will add value and beauty to your home. Now you are ready to lay out the first course – let’s get started!
Lay Out the First Course of Hardie Plank Siding
Lay out the first course of Hardie Plank siding by measuring the area where you plan to install it. Be sure to leave a 1/8-inch gap between each panel for expansion and contraction.
- Start by securing the panels at the bottom and then move up, making sure each panel is properly secured with roofing nails or screws.
- As you go, be sure to check that your panels are level by using a leveler or chalk line.
- Once all of your panels are in place, finish up by caulking around edges and painting or staining as desired for a finished look.
With these easy steps, you’ll have a beautiful, long-lasting siding that will add value and curb appeal to your home.
Measure and Cut Pieces to Fit Windows, Doors, and Corners
It’s important to measure and cut pieces of Hardie Plank siding to fit around windows, doors, and corners before you install them.
- Start by measuring the area where you plan to install the siding using a tape measure. Mark off any areas that need to be cut with a pencil or marker.
- Then use a circular saw or jigsaw to make the cuts and adjust as needed until they fit properly.
- If you are cutting around corners, be sure to leave a 1/8-inch gap between each panel for expansion and contraction.
- Finally, finish up by caulking around edges and painting or staining as desired for a finished look.
With these easy steps, you’ll have beautiful, long-lasting siding that will add value and curb appeal to your home.
Install Battens for Seams Between Courses of Hardie Plank Siding
Installing battens is an important step when installing Hardie Plank siding. Battens provide a level surface for the courses of siding and also help to hide seams between them.
- To install battens, start by measuring the course of siding that will be covered and mark off where you plan to place them with a pencil or marker.
- Then cut the battens to size using a miter saw or circular saw.
- Once they are cut, pre-drill holes in each end of the batten and attach it to the wall with galvanized nails or screws.
- Finally, fill any gaps between courses of siding with an appropriate caulk before painting or staining as desired for a finished look.
With these simple steps, you’ll have beautiful, level siding that will add value and curb appeal to your home.
Fasten with Galvanized Nails or Stainless Steel Screws
Galvanized nails and stainless steel screws are the two most widely used fasteners when installing Hardie Plank siding. Galvanized nails are resistant to corrosion and provide a strong hold, while stainless steel screws are ideal for saltwater climates due to their superior rust-resistance. For the best results, use galvanized nails or stainless steel screws that are specifically designed for siding applications. When installing with fasteners, make sure to space them correctly to ensure adequate holding power and prevent cracking of the siding. Additionally, be sure to predrill holes in each end of the batten before attaching it with the fasteners for a secure fit. With these easy tips, you’ll have beautiful, level siding that will add value and curb appeal to your home.
Finishing Touches
Once you have installed your Hardie Plank siding, it’s time to add the finishing touches. One of the simplest and most effective ways to give your home an elegant look is to caulk all the seams between the boards and around any windows or doors. This will create a seamless finish that gives your home a polished look. You should also opt for high-quality paint or stain when painting or staining your siding. This will protect it from UV rays, water damage, and other environmental elements while making sure that it always looks like new. Finally, don’t forget to clean off any dirt or debris that may have accumulated during installation so that your siding shines like new! With these finishing touches, you’ll be sure to boost your home’s curb appeal while creating an attractive exterior that you can feel proud of.
By following these simple tips, your Hardie Plank siding will create a beautiful finish that adds elegance, durability and protection to your home. Now onto the next step: caulking any gaps around windows and doors for a seamless, polished look!
Caulk Any Gaps Around Windows and Doors
Caulking any gaps around windows and doors is an essential part of finishing your Hardie Plank siding. Caulk provides a seamless finish that looks professional and gives your home a polished look. It also protects against water damage, UV rays, and other environmental elements.
To ensure a perfect finish, you should choose a high-quality caulk that matches the color of your siding.
- Start by applying caulk along all the seams between the boards and around any windows or doors.
- Be sure to fill in any small cracks or gaps as well.
- Once you have finished caulking, use a wet rag to smooth out the surface of the caulk and create a neat and even finish.
- Allow it to dry completely before painting or staining your siding.
By following these simple steps, you can easily give your home’s exterior an attractive, professional look while providing extra protection from harsh weather conditions and other environmental elements. With just a bit of effort, you will be sure to create a flawless finish that adds style, durability and protection to your home for years to come!
Maintenance Tips
Taking care of your Hardie Plank siding is important to ensure its longevity and beautiful finish. To keep your siding in great condition, there are a few maintenance tasks you should perform regularly.
- First, inspect your siding for any signs of damage or wear-and-tear such as cracked, chipped, or broken pieces of siding. If you find any, it’s best to take care of the issue promptly as even minor damages can lead to more serious problems if left unchecked.
- You should also clean your siding on a regular basis with an appropriate cleaner designed specifically for Hardie Plank siding. This will help remove dirt and dust buildup that can cause discoloration over time. Be sure to use only soft cleaning brushes and nonabrasive cloths when performing the task.
- Finally, check for any loose nails or screws along the edges of each plank and tighten them if necessary. Loose fasteners can cause warping or other issues with your siding so be sure to address them right away.
By following these maintenance tips, you can keep your Hardie Plank siding looking great for many years!
Taking care of your Hardie Plank siding is an important part of maintaining the beauty and longevity of your home. Regular cleaning and inspection will ensure that your siding looks great for years to come. And, don’t forget that regular cleaning can also help prevent pest infestations – more on that in the next section!
Clean Regularly to Prevent Pest Infestations
Keeping your Hardie Plank siding clean is important for more than just keeping it looking its best. Regularly cleaning your siding can also help prevent pest infestations from occurring. Dirt and debris buildup on the siding can attract pests like ants, spiders, and other bugs, creating an inviting environment for them to move in. Additionally, some of these pests may even try to set up nests or colonies in the crevices of your siding.
A thorough cleaning of your Hardie Plank siding regularly will help prevent this from happening as dirt and debris buildup offers these pests a place to hide and take cover. Be sure to use a cleaner specifically designed for Hardie Plank siding so you don’t accidentally damage it with aggressive scrubbing or harsh chemicals. Also, be vigilant about checking for any cracks or holes that insects could use to get inside – seal them up promptly if you find any!
By following these steps, you can help keep pests away from your home and ensure that your Hardie Plank siding looks great for years to come.
Re-Caulk as Needed to Prevent Moisture Damage
Re-caulking Hardie Plank siding is an important part of maintaining the integrity and beauty of your home. Over time, caulking can become brittle and crack, leading to water infiltration behind the siding and potential damage to your home. To help prevent this, it’s important to check around windows, door frames, and other openings regularly for any signs of cracking or peeling caulk.
If you find any areas that need re-caulking, it’s best to remove the old caulk first before applying the new. You can do this by using a putty knife or metal scraper to gently scrape away any existing caulk residue. Once all of the old caulk has been removed, make sure the area is clean and dry before applying the new caulk. Be sure to use a high quality caulking product designed specifically for Hardie Plank siding so you get a lasting seal that will help keep moisture out of your home!
Inspect Annually for Signs of Deterioration
It’s important to inspect your Hardie Plank siding annually for signs of deterioration, such as cracking, warping, or rotting. While these issues can be caused by a number of factors, including excessive moisture and UV exposure, they can often be caught early with regular inspections.
During your inspection, look for any visible damage to the siding panels and pay close attention to areas around windows and doors where water may collect and cause problems. If you find any damaged boards or pieces that need replacing, remove them immediately and replace them with new ones. Additionally, make sure to inspect the caulk around windows and doors to ensure it is in good condition. Finally, keep an eye out for any signs of mold or mildew which could indicate a moisture issue inside your home. Taking the time to inspect your Hardie Plank siding regularly will help keep it looking great while also protecting your home from potential damage.
Conclusion
Hardie Plank siding installation is not difficult, but it does require some know-how and attention to detail. Taking the time to ensure proper preparation, layout, and installation will result in a beautiful finish that can last for years. Additionally, regular inspections are important to identify any potential issues with your siding before they become larger problems. With these tips and tricks in hand, you can enjoy a flawless Hardie Plank siding installation that looks great and provides lasting protection for your home.