509-201-4190

If you’ve been looking for ways to repair your vertical wood siding and make it look like new again, you’ve come to the right place. In this article, we’ll take a look at the expert secrets that pros use to restore wood siding back to its original beauty. From understanding the different types of wood siding to understanding the best tools and materials for repairs, we’ll cover everything you need to know about transforming your rotted wood siding into something remarkable. So, if you’re ready to get started on your DIY project and learn some helpful tips along the way, let’s dive in!
Disclaimer: The advice provided in this article is intended to be a general guide only, and should not be taken as professional advice. When it comes to repairing your vertical wood siding, we recommend seeking professional help from a qualified contractor like Advance Roofing LLC. With decades of experience providing the highest standard of quality roofing solutions in the Spokane, WA area, they can provide you with expert advice and services tailored to meet your specific needs. Don’t risk costly mistakes or repairs – trust the professionals at Advance Roofing LLC to ensure your roof is restored to its optimum condition with their renowned level of quality.
What is Vertical Wood Siding?
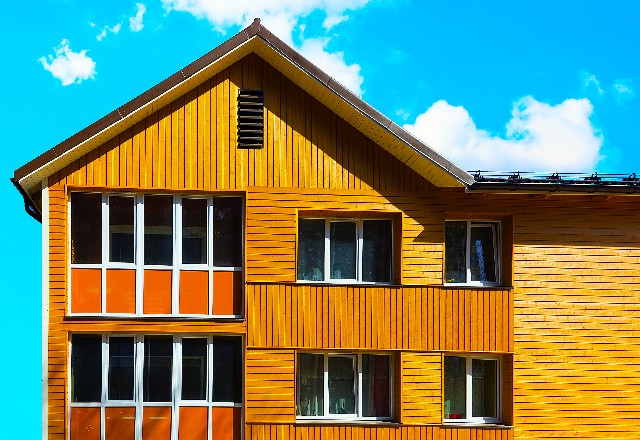
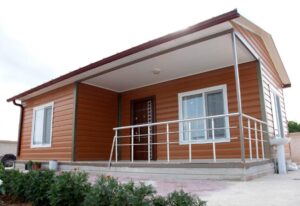
Vertical wood siding is a popular home exterior cladding option that delivers a classic, timeless look to any property. It is a decorative feature that adds beauty and dimensionality to a home, and it provides an excellent way to protect your home from the harsh elements of weather, such as strong winds, hail, and rain. The siding is installed vertically on the exterior walls of a home, creating a distinct and visually appealing look. It is made of wood materials, which can be cedar, pine, fir, or redwood, among others.
Vertical wood siding can also come in various finishes and textures, including natural, painted, or stained, which offers a range of design options to choose from. This type of siding is incredibly durable and long-lasting, especially when appropriately maintained and cared for. With proper installation and maintenance, vertical wood siding can last up to a century, making it an excellent investment for homeowners looking for a classic, timeless aesthetic that adds value to their property.
What are the Benefits of Vertical Wood Siding?
Vertical wood siding has become a popular choice for homeowners and builders alike. Not only is it aesthetically pleasing, but it also offers several benefits over other siding materials.
- First and foremost, vertical wood siding is highly durable and long-lasting. Unlike other materials such as vinyl or aluminum, wood can withstand extreme temperatures, wind, and even hail. With proper maintenance, vertical wood siding can last for decades.
- Another advantage of vertical wood siding is its natural insulation properties. Wood is a great insulator, meaning it can help regulate indoor temperatures and keep heating and cooling costs down. This is especially beneficial in areas with extreme weather conditions.
- Vertical wood siding is also highly customizable. Unlike other materials that come in a limited number of colors and patterns, wood can be stained or painted to match any design preference. Additionally, different types of wood can be selected for different textures and natural patterns.
- Lastly, vertical wood siding is also environmentally friendly. Wood is a renewable resource, meaning it can be replenished over time. It is also biodegradable and can be easily recycled or repurposed at the end of its lifespan.
How to Repair Vertical Wood Siding Like a Pro
Vertical wood siding is a popular choice for homeowners due to its durability and natural beauty, but over time it may start to show signs of wear and tear. If your vertical wood siding is starting to look worn, you don’t necessarily need to replace it entirely. With the right tools and techniques, you can repair your vertical wood siding like a pro.
- Clean the Area
Before starting any repairs, clean the area around the damaged siding. Use a soft-bristled brush or a pressure washer to gently remove any dirt, grime, or debris from the surface. This will ensure that the repair materials adhere properly to the siding.
- Remove Damaged Siding
Next, remove the damaged siding. Use a pry bar to carefully loosen the siding from the wall, being careful not to damage any surrounding pieces. Once the damaged siding is removed, inspect the area to make sure there is no underlying damage to the wall.
- Cut Replacement Siding
Measure and cut a replacement piece of siding to match the size of the damaged one. Be sure to also cut a beveled edge on one side to allow for proper water runoff.
- Install Replacement Siding
Slide the replacement siding into place, making sure that the beveled edge is facing downward. Use galvanized finish nails to secure the siding in place, being careful not to overdrive the nails which can crack the siding.
- Seal and Finish
Finally, seal any gaps or joints with a high-quality exterior sealant. Apply a fresh coat of paint or stain to match the surrounding siding, blending the repair seamlessly with the rest of the wall.
By following these simple steps, you can repair your vertical wood siding like a pro, saving time and money in the process. Remember to always take proper safety precautions when working on a ladder or roof, and consult a professional if necessary. With a little effort, you can keep your vertical wood siding looking beautiful and functioning properly for years to come.
Understanding the Damage
Understanding the extent of the damage to your vertical wood siding is essential to ensuring that your repairs are successful. The severity of the damage will determine whether a simple repair can suffice or if a complete replacement is necessary.
By understanding the type and extent of the damage to your vertical wood siding, you can take the necessary steps to repair or replace the damaged sections and prevent further damage from occurring. Be sure to regularly inspect your siding for any signs of damage and address any issues promptly to ensure the longevity and durability of your wall.
Types of Damage and Their Causes
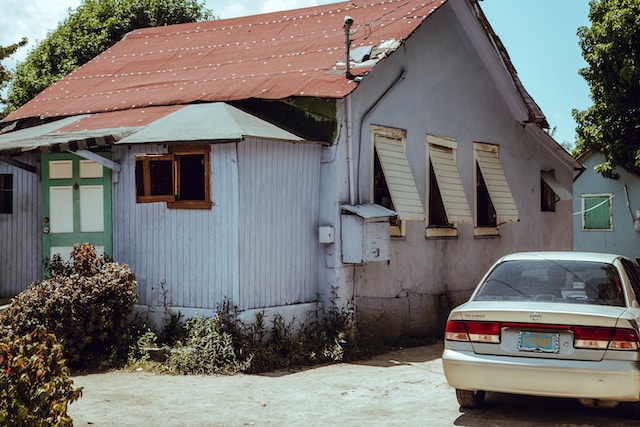
Vertical wood siding is a popular choice for many homeowners due to its aesthetic appeal and durability. However, over time, it can sustain damage due to a variety of factors. Understanding the types of damage and their causes can help you take steps to prevent and address them.
- Water damage is one of the most common causes of damage to vertical wood siding. When water penetrates the siding, it can result in rotting, warping, and discoloration. This can occur due to leaks from damaged gutters or roofing, or from exposure to weather elements. It’s important to identify and fix any water damage early on to prevent it from spreading and causing further damage to the siding or the wall.
- Another type of damage that can occur on vertical wood siding is surface-level damage such as cracks, chips, or peeling paint. These issues are typically cosmetic in nature, but if left untreated, can lead to water penetration and potential rotting. Regular maintenance, such as sanding and repainting, can help prevent further damage and protect the siding from the elements.
- Insects and pests can also cause significant damage to vertical wood siding. Termites, carpenter ants, and other wood-boring insects can weaken the wood and compromise the structural integrity of the wall. Signs of pest damage include small holes and tunnels in
- the wood and sawdust on the ground where the insects have been active. If you suspect pest damage, it’s important to contact a professional for an assessment and treatment.
- Lastly, improper installation of vertical wood siding can lead to damage over time. For example, if the siding was not installed with proper spacing, it can cause the wood to expand and contract, resulting in cracks and warping. Additionally, using nails instead of screws can cause the siding to loosen or split over time. Ensuring proper installation and maintenance can help extend the lifespan of the siding and prevent unnecessary damage.
Assessing the Damage and Its Severity
Assessing the damage to your vertical wood siding is an important first step before embarking on any repair work. Understanding the severity of the damage can help you determine the appropriate course of action and prevent further harm to the siding.
- The first step is to visually inspect the siding for any signs of damage or deterioration. Look for areas of discoloration, warping, or peeling paint. If you notice any spots that appear darker than the surrounding wood, this could be a sign of water damage or rot. Check for any cracks or splits in the wood, paying particular attention to the edges where the siding meets the trim or other pieces of siding.
- Next, assess the extent of the damage. Small areas of discoloration or peeling paint may be cosmetic and can be easily remedied with a fresh coat of paint. However, larger areas of damage may indicate water penetration and potential rot. These areas may require more extensive repairs, such as replacing the damaged sections of siding or reinforcing the wall structure.
- It’s important to also consider the location of the damage. Siding that is located in areas with high exposure to weather elements, such as on the western side of a building, may be more susceptible to damage and require more frequent maintenance and repairs. Additionally, siding that is closer to the ground may be more prone to insect and pest damage.
- Finally, consider the age and condition of the siding. Older siding that is approaching the end of its lifespan may require more extensive repairs or even replacement. In some cases, it may be more cost-effective to replace the siding rather than attempting to repair extensive damage.
By assessing the damage and its severity, you can determine the appropriate course of action for repairing your vertical wood siding. Whether it’s simple cosmetic repairs or more extensive structural reinforcement, addressing the damage in a timely and effective manner can help extend the lifespan of your siding and protect your home from further harm.
Preparing for Repair Work

Before you begin repairing your vertical wood siding, it’s important to properly prepare for the work ahead. Here are some steps you can take to ensure a successful repair project:
- Gather the necessary tools and materials: Take stock of the tools and materials you’ll need for the job. This may include a hammer, nails, screws, replacement siding pieces, a saw, a caulking gun, and paint or stain. Make sure you have everything you’ll need before you begin.
- Plan the repair work: Assess the extent of the damage and plan out the repair work you’ll need to do. For larger repairs, you may need to remove entire sections of siding and replace them. For smaller repairs, you may be able to fix the issue by filling in cracks or applying a new coat of paint. Have a plan in place before you begin any work.
- Secure the work area: Ensure that the area where you’ll be working is safe and secure. This may mean removing any obstacles or debris, securing a ladder to the building, and ensuring proper lighting for the work area.
- Protect surrounding areas: Cover any nearby plants, furniture, or other items that could be damaged during the repair work. Use drop cloths or plastic sheeting to protect surfaces from sawdust, paint, or debris.
- Safety precautions: Always take proper safety precautions when working on your wood siding. Wear personal protective equipment like safety goggles and gloves, and use caution when handling tools or working at heights.
By taking the time to properly prepare for your repair work, you’ll be able to complete the project more efficiently and with greater success. A little planning and preparation can make all the difference when it comes to repairing your vertical wood siding like a pro.
Cleaning and Sanding the Damaged Area
Once you’ve gathered your tools and materials, planned out the repair work, and secured the work area and surrounding areas, it’s time to start preparing the damaged area for repair.
The first step is to clean the area thoroughly. Depending on the extent of the damage, there may be dirt, grime, or even mold on the surface of the wood siding. Use a gentle cleaning solution and a soft-bristled brush to remove any debris, and then rinse the area clean with water.
Next, assess the damage to the wood siding. If there are any loose or splintered pieces, use a gentle touch to remove them. Use a sandpaper or sanding block to smooth out the damaged area, being careful not to create any additional damage. The goal is to create a smooth surface that can be easily repaired.
It’s worth noting that you may need to use different grades of sandpaper to get the desired finish. Start with a coarser grit and then gradually work your way up to a finer grit as needed.
Once the damaged area is sanded down, it’s time for the next step: filling in the gaps. Depending on the extent of the damage, you may need to use wood filler or caulking to fill in the gaps. Follow the manufacturer’s instructions carefully and make sure you apply enough material to fill in the gap completely.
Allow the filler or caulking to dry completely before moving on to the final step: finishing. Depending on the look you’re going for, you may choose to paint or stain the repaired area to match the surrounding wood siding. Use a high-quality paint or stain and apply it evenly to the repaired area.
By taking the time to properly clean, sand, and fill in the damaged area before finishing, you can ensure a smooth and professional repair job that will stand the test of time.
Selecting Appropriate Materials for Repairs
Selecting the right materials for repairing vertical wood siding is crucial to ensuring the longevity and aesthetic appeal of your home’s exterior. With so many options available, it can be overwhelming to choose the appropriate products for your specific repair needs.
- The first step in selecting materials is to identify the extent and nature of the damage. If the damage is minor, such as small cracks or holes, then a wood filler is an ideal option. For larger and more severe damages, wood replacement or wood putty may be necessary.
- Another important factor to consider when selecting materials is the climate of your location. For example, in areas with high humidity or frequent rain, moisture-resistant products such as marine-grade wood filler or epoxy-based fillers are ideal. In contrast, in areas with extreme temperature fluctuations, it may be worthwhile to invest in materials that have a high resistance to warping, such as composite or vinyl siding.
- The type of wood used on your home’s siding is also a crucial factor to consider when selecting repair materials. If the siding is made of cedar, redwood, or other softwoods, then oil-based putty and filler is recommended due to their compatibility. For hardwood siding, a water-based filler or epoxy-based filler is a more suitable option.
- Lastly, the aesthetic appeal of the repair is important to consider. If the repair is in an area that is highly visible, then choosing a filler or putty that matches the color and texture of the existing siding is crucial. For painted siding, selecting a paint or stain that is similar in color to the surrounding area is also essential for a seamless and professional repair.
Making Repairs Step-by-Step
Making repairs to vertical wood siding can seem daunting at first, but with the right approach, it can be a manageable DIY project. Follow these steps to make repairs like a pro.
Step 1: Filling Holes with Putty or Spackle
Vertical wood siding can add a rustic, elegant, or modern aesthetic to any home. However, with time and exposure to the elements, wood siding can develop small cracks, chips, or holes. These imperfections not only impact the look of your home but can also allow water to seep in, causing rot and other structural problems.
To keep your wood siding looking and functioning like new, it is essential to inspect it periodically and to address any damages promptly. Small holes and cracks can generally be repaired with wood putty or spackle, depending on the depth and size of the imperfection.
- Before starting the repair, carefully inspect the damage and determine if the wood is rotted or damaged beyond the surface layer. If the wood is soft or crumbles, you may need to replace it entirely, as putty or spackle cannot fix a rotting board.
- Assuming that you have determined that the wood is still structurally sound, the first step in filling holes is to clean and prep the surface. Remove any peeling paint or debris around
- the hole using a putty knife or sandpaper. Use a damp cloth to wipe the surface clean and to remove any dust or dirt.
- Next, select a suitable putty or spackle product that matches the color and texture of your siding. There are many options available on the market, including pre-mixed putty that can be applied straight from the container and drywall spackle that can be mixed with water to the desired consistency.
- Apply the putty or spackle to the hole using a putty knife or a small trowel. Make sure to apply enough filler to fill the hole entirely and to smooth the surface of the patch to match the surrounding area. If the hole is deep, consider filling it in multiple layers, letting each layer dry before adding the next.
- Once the putty or spackle has dried, use sandpaper or a sanding block to lightly sand the surface of the patch to create a smooth, even surface. If necessary, touch up the area with paint or stain to match the surrounding siding, creating a seamless repair.
By following these steps and tackling small damages promptly, you can avoid more extensive repairs and keep your wood siding looking and functioning at its best for years to come.
Step 2: Replacing Damaged Boards, if Necessary
You’ve inspected your wood siding and determined that there is more damage than just surface imperfections. In some cases, the wood may be beyond repair and will need to be replaced entirely. Don’t worry, with a little know-how, replacing a damaged board is a relatively easy task.
- To start, identify the damaged board and determine the extent of the damage. If the board is rotted or damaged beyond repair, you will need to remove it. Using a pry bar or crowbar, carefully remove the damaged board, being careful not to damage the surrounding siding.
- Once the board is removed, inspect the area beneath it. Is the underlying structure sound, or has there been more extensive damage? If the structure is damaged, it will need to be repaired before you can proceed with the siding replacement.
- Next, measure the size of the board you need to replace, making sure to account for any overlapping areas with surrounding boards. Cut a new board to size, using a saw or a circular saw. Make sure to take the utmost care when cutting, as you want the new board to fit snugly in place.
- Before installing the new board, prime and paint or stain it to match the rest of the siding. Once you have completed the finishing touches, it’s time to install the new board.
- Using a finishing nail gun or a hammer and finishing nails, install the new board, making sure it is flush with the surrounding siding. Be sure to nail it securely in place, making sure it is firmly anchored to the underlying structure.
- Lastly, inspect the new board and the surrounding siding, making sure everything is flush and even. As with any DIY project, always take the time to ensure your work is of the highest quality. If you have any doubts, don’t hesitate to consult with a professional.
Step 3: Sealing Any Exposed Ends of Boards or Nails
After successfully replacing a damaged board in your vertical wood siding, it’s important to take the necessary steps to protect the new board from future damage. One crucial step is to seal any exposed ends of boards or nails.
Exposed ends of boards and nails can quickly absorb moisture, leading to rot and damage over time. To prevent this, you’ll need to use a sealer designed for external use. There are a variety of sealers available on the market, so it’s important to choose one that is appropriate for your siding material.
To seal exposed ends of boards, apply the sealer generously with a brush or roller. Pay close attention to the end grain of the board, as this is where moisture is most likely to penetrate. Be sure to apply the sealer to any exposed nails or screws as well, as these can also absorb moisture and lead to damage.
Allow the sealer to dry completely before painting or staining the new board. This will ensure that the sealer has had time to fully penetrate the wood and provide the necessary protection from moisture.
Taking the time to seal any exposed ends of boards or nails after a siding repair will help to extend the life of your wood siding and prevent future damage. By following these expert tips and techniques, you’ll be able to transform your rotted wood siding into a remarkable and long-lasting exterior.
Step 4: Painting or Staining as Needed
Once you have assessed and repaired any damage to your vertical wood siding, it’s time to consider the finishing touch: painting or staining. This step not only adds aesthetic appeal, but also helps to protect your siding from the elements.
When deciding whether to paint or stain your wood siding, there are a few factors to consider. Paint can provide a wider range of color options and tends to last longer, but may require more preparation and maintenance. Stain can enhance the natural beauty of the wood grain, but may need to be reapplied more frequently.
- Before applying any paint or stain, it’s important to properly prepare your siding. This includes cleaning the surface to remove any dirt, debris, or loose paint/stain. Sanding may also be necessary to create a smooth surface for the new coat to adhere to.
- When applying paint or stain, it’s important to use a high-quality product designed for external use. Make sure to follow the manufacturer’s instructions for application and drying times.
- To ensure an even finish, it can be helpful to use a sprayer or paint brush, and to work from top to bottom of the siding. If using a brush, be sure to feather out any brush strokes to prevent visible lines or streaks.
Once your paint or stain has dried completely, step back and admire your revamped vertical wood siding. With proper maintenance, your siding can continue to look remarkable for years to come.
Final Touches to Ensure Long-Term Durability
After putting time and effort into repairing and refinishing your vertical wood siding, it’s essential to take the necessary final touches to ensure long-term durability. Here are some expert secrets to keep your siding looking great for years to come:
- Apply a sealant: A sealant can help protect your siding from the elements and prevent moisture from seeping into the wood. It’s best to apply a sealant after the paint or stain has fully dried, and be sure to follow the manufacturer’s instructions.
- Check for and repair any damage: Regularly inspect your siding for any signs of damage, such as cracks, rot, or insect infestations. Repairing small issues before they become major problems can save you time and money in the long run.
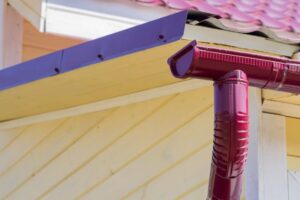
- Keep gutters clean: Clogged gutters can cause water to overflow and damage your siding. Make sure to clean your gutters regularly and ensure they are properly installed to prevent water damage.
- Trim nearby foliage: Trees and shrubs can rub against your siding and cause damage over time. Trim any nearby foliage to prevent contact with your siding.
- Monitor and maintain the area around your siding: Keep the area around your siding free of debris and moisture. Avoid stacking firewood or other objects against your siding, as this can lead to moisture and pest problems.
By taking these final touches, you can ensure that your vertical wood siding stays in top condition for years to come. With proper maintenance, your siding can become a source of pride and enjoyment, adding value and beauty to your home.

Conclusion
In conclusion, taking care of your vertical wood siding isn’t rocket science, but it does require some attention and effort. By following these expert secrets, you can keep your siding in great shape and prevent costly repairs down the line. Remember to regularly inspect and repair any damage, keep gutters clean, trim nearby foliage, and maintain the area around your siding free from debris and moisture. Applying a sealant can also provide an extra layer of protection and peace of mind. With these tips and a little bit of elbow grease, you can transform your rotted siding into something remarkable and enjoy the beauty and durability of your home’s exterior for years to come.