509-201-4190

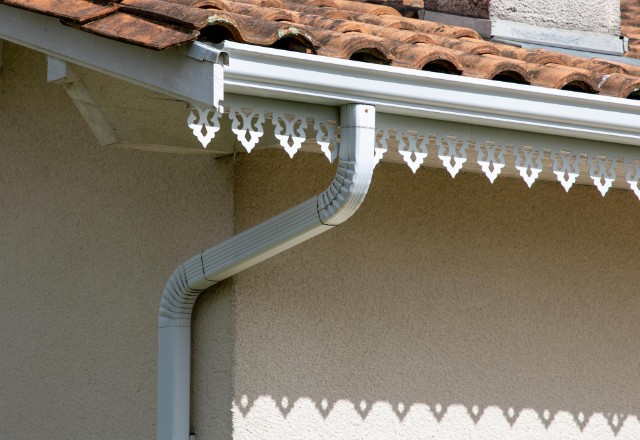
Gutters play a crucial role in protecting your home’s foundation, walls, and landscaping from water damage caused by heavy rainfalls. Seamless gutters are a popular choice for many homeowners because they offer superior protection against water damage and are more aesthetically pleasing than traditional sectional gutters. In this article, we will explore what seamless gutters are and why they are a wise investment for your home.
Disclaimer: This article is for informational purposes only and is not meant to replace professional advice from a qualified roofing contractor. We encourage homeowners to contact Advance Roofing LLC, who have the experience and expertise necessary to guide them in making safe and reliable decisions about their home’s roofing needs.
DIY Seamless Gutter Benefits
Making your own seamless gutters at home offers a range of benefits that are worth considering. First and foremost, it allows for significant cost savings as professional installations can be costly. Additionally, DIY gutters provide customization options, such as the ability to choose the exact size and color of the gutters.
To begin the project, you will need materials such as aluminum coil stock, gutter sealant, downspout outlets, and hangers. Moreover, a portable seamless gutter machine is required to create the desired gutter profile. This allows you to make different types of gutters, including k-style and half-round gutters.
Aluminum is a popular choice for DIY seamless gutters due to its durability and resistance to rust and corrosion. However, proper preparation is key to the success of the installation. Be sure to measure the roofline accurately and securely fasten the gutters to the fascia board.
Materials Needed for DIY Seamless Gutters
When it comes to gutter installation, DIYers can save significant amounts of money by doing it themselves. However, creating seamless gutters requires specific equipment and materials.
- For a successful DIY seamless gutter project, you will need aluminum coil stock, gutter sealant, downspout outlets, and hangers.
- Additionally, you’ll need a portable seamless gutter machine to form the gutters into the desired profile. Incorrect preparation or materials can lead to ineffective gutter systems that may not withstand heavy rains.
Hence, it is essential to carefully select the materials and follow the appropriate guidelines to ensure the longevity of your system.
Gutter Machine
A gutter machine is a valuable investment for any business involved in the production of seamless gutters. There are various types of machines available, with the BG7 box gutter machine being a popular choice due to its ability to produce two different profiles.
To increase productivity and efficiency, it’s beneficial to use accessories such as reel stands, transfer racks, and machine covers. These accessories make it easier to handle materials and protect the machine from external factors.
In addition to accessories, there are also add-on options available for gutter machines. These options can provide the machine with added features depending on the specific needs of the business. For example, a cradle roll can be added to increase efficiency, and a decoiler can be added to handle larger sizes of gutter material.
Gutter Material
When it comes to seamless gutters, there are several materials to choose from. The most common options include aluminum, copper, vinyl, and galvanized steel. Each material has advantages and disadvantages depending on your budget, durability needs, and aesthetic preferences.
- Aluminum is the most popular material for seamless gutters due to its affordability and durability. It’s lightweight and easy to install, making it a popular choice for DIY projects. Plus, it’s resistant to corrosion and comes in a variety of colors.
- Copper, while more expensive, is a highly durable and aesthetically pleasing option for seamless gutters. It’s known for its long lifespan and unique patina that develops over time. However, it requires professional installation and maintenance.
- Vinyl is the most budget-friendly option for seamless gutters. It’s easy to install and doesn’t require painting or maintenance. However, it’s not as durable as other options and can crack or warp over time.
- Galvanized steel is a durable and affordable option for seamless gutters. It’s resistant to rust and can withstand heavy rains and strong winds. However, it’s prone to scratching and may require some maintenance over time.
Ultimately, the best gutter material for your project will depend on your specific needs and budget. Consider factors such as durability, aesthetics, and maintenance requirements when choosing the right material for your seamless gutters.
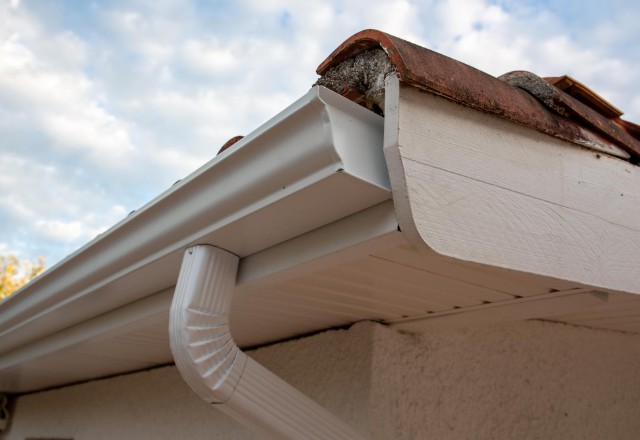
Downspout Outlets
Downspout outlets are an essential accessory for seamless gutter systems as they allow for the proper drainage of rainwater. There are different types of downspout outlets available in the market, and their costs vary depending on the material.
The most common downspout outlet materials are aluminum, vinyl, and steel. Aluminum downspout outlets cost around $4 to $6 per linear foot, while those made of vinyl cost
around $2 to $4 and steel downspout outlets cost an average of $3 to $5 per linear foot.
When installing a downspout outlet, it’s crucial to mark and cut it carefully in the gutter to ensure proper water flow. Double-check for any obstacles like screws or brackets that may block the downspout and cause water accumulation, which can lead to significant damage.
In addition to downspout outlets, other necessary accessories for seamless gutters include end caps, flashing, heat tape, splash blocks, and downspout extensions. End caps and flashing seals the edges of the gutters to keep water from leaking out, while heat tape prevents ice buildup in colder climates. Downspout extensions and splash blocks direct water away from the building’s foundation and prevent soil erosion.
The cost of these accessories varies depending on the material, with vinyl and aluminum being the most affordable options. End caps cost around $1 to $3 per piece, flashing $10 to $20 per piece, heat tape $50 to $100 per roll, splash blocks $5 to $10 per piece, and downspout extensions $10 to $25 per piece.
Additional Accessories
Apart from the essential accessories mentioned earlier, certain additional accessories can increase the efficiency and productivity of the DIY seamless gutter installation process. These accessories are vital to ensure that the installation process is smooth, and the gutters function optimally.
- One of the additional accessories that can be helpful during the installation process of seamless gutters is the reel stand. Reel stands are used to hold the gutter coil in place and allow for easy feeding into the gutter machine. The reel stand ensures that the coil is uniformly fed, which reduces the likelihood of damage to the material and increases productivity.
- Similarly, run-out stands are used to support the output of the seamless gutter and prevent it from bending or twisting. This accessory helps to maintain the integrity of the gutter machine output, which is crucial for the proper functioning of the gutter system.
- Riser pads also fall under the category of additional accessories that can be helpful. They are used to support the seamless gutter machine on uneven surfaces to ensure stability. This accessory is essential for individuals that intend to use their gutter machines in different locations and need to adjust to varying terrains.
- Finally, machine covers can be used to protect the gutter machine during transportation or storage. This accessory helps to prevent scratches, dents, and other forms of damage that can reduce the lifespan of the gutter machine. Although not necessary, these additional accessories can increase productivity and protect the gutter machine, ensuring that the DIY seamless gutter installation process is successful.
Steps to Make a DIY Seamless Gutter System
Are you tired of dealing with messy and dysfunctional gutters? Creating your own seamless gutter system can be an ideal solution. Not only is it a cost-effective option, but it also ensures that your gutters fit perfectly and provide the necessary protection against water damage. In this guide, we’ll take you through the steps involved in making a DIY seamless gutter system so that you can enjoy a seamless and efficient rainwater drainage system in no time.
Step 1: Assemble the Necessary Tools and Materials
The first step in creating a DIY seamless gutter system is to gather all the necessary tools and materials. The list includes a coil of gutter material, a gutter machine, end caps, hangers, downspouts, elbow joints, gutter sealant, a measuring tape, a drill, and screws. Make sure you have everything you need before starting the installation process.
Step 2: Measure and Cut the Gutter Material
The next step is to measure and cut the gutter material to the desired length. Use a measuring tape to ensure accuracy and cut the material using the gutter machine. The gutter machine is essential for creating seamless gutters as it bends and shapes the coil into the desired gutter profile.
Step 3: Install the End Caps and Hangers
Attach the end caps to the gutter’s edges to prevent water from spilling out. Then, install hangers at regular intervals along the length of the gutter to support it and maintain its shape.
Step 4: Attach the Downspouts, Elbow Joints, and Sealant
Attach the downspouts and elbow joints to the gutter’s outlet using screws and sealant. The sealant ensures a watertight connection and prevents leaks.
Step 5: Test the System
After installation, test the seamless gutter system by running water through it. Check for any leaks or issues and make sure the system is functioning optimally.
Step 6: Proper Maintenance
Maintaining your DIY seamless gutter system is crucial to ensure its longevity and efficiency. Make sure to clean the gutters regularly, especially after heavy rainfall, and inspect them for any damages that need repair. With proper maintenance, your seamless gutter system can last for years and provide effective protection against water damage.
Step 1: Measure the Roof’s Length and Width

Before installing seamless gutters, it is crucial to measure the length and width of your roof accurately. This information will determine where the gutter system should start and end, as well as how much gutter material is needed to cover the entire roof. You can use a measuring tape or other measuring tools to ensure precise measurements.
In addition to determining the size of the gutter system required, roof pitch should also be considered during preparation. Roof pitch affects the cost of labor involved in installing the gutter system, as steeper roofs require more specialized equipment and techniques to ensure proper installation.
Knowing the exact measurements of your roof and its pitch will help you estimate the total cost of materials and labor required for your seamless gutter installation. It is important to accurately measure your roof to ensure that your gutter system is effective in protecting your home from water damage.
Step 2: Calculate How Much Material You’ll Need (Linear Foot)
When undertaking a DIY seamless gutter project, it’s important to accurately determine how much material you’ll need to complete the job. The key measurement to consider is linear feet, or the length of gutter required to cover the roof’s perimeter.
To calculate the linear feet of gutter needed, measure the length and width of your roof. Add these measurements together, then multiply by the number of stories in your home. Finally, divide the result by 12 to convert the measurement to linear feet.
It’s also essential to factor in downspouts and elbows when determining the amount of material required. These components help direct water away from your home and prevent damage. Calculate the linear feet of downspouts needed in addition to the linear feet of gutter to ensure you purchase enough material.
Taking accurate roof measurements and properly factoring in downspouts and elbows will help ensure you purchase the appropriate amount of material for your DIY seamless gutter project.
Step 3: Choose Your Gutter Type (K-Style, Half-Round, Sectional, etc.)
When it comes to choosing gutters for your home, there are several types to consider. K style gutters are rectangular and have a flat bottom and back with a decorative front that mimics crown molding. They are a popular choice among homeowners as they can hold more water and are available in a variety of materials and colors. The downside to K-style gutters is that they can be more difficult to clean due to their shape.
Half-round gutters have a U-shaped cross-section and are typically made of copper or aluminum. They add a classic and elegant look to your home, but may not be as practical as K-style gutters in areas with heavy rains as they have a smaller capacity for holding water.
Sectional gutters are typically made of vinyl or aluminum and come in pre-cut sections that are pieced together during installation. They are the most cost-effective option, but can be prone to leaks and may not last as long as seamless gutters.
Choosing the right gutter type for your home largely depends on your budget, style preferences, and the climate in your area. Consider the benefits and drawbacks of each type before making a decision.
Step 4: Cut the Gutters to Size
Once you have determined the appropriate size and diameter of gutters for your home according to linear feet and rainfall intensity, it’s time to cut the gutters to size. You’ll need a saw to do this.
When cutting the gutter to size, use the measurements you took earlier and mark them on the gutter with a pencil or marker. Ensure that the hole cut for the gutter is big enough to fit the gutter securely. This will prevent any leaks or damages caused by water.
It’s important to take your time when cutting the gutters to avoid any mistakes. You may want to use safety equipment, such as protective eyewear and gloves, when cutting the gutters to ensure safety.
Once the gutters are cut to size, you’re ready to move on to the installation process. Remember to always follow safety protocols and to double-check your measurements before beginning any installation work. With a little bit of time and effort, you can install your own seamless gutters and protect your home from water damages.
Step 5: Install the Downspout Outlets and Other Accessories
Once you have cut and installed the gutters, it’s time to complete the system by installing the necessary accessories. The downspout outlets are necessary to direct water from the gutters into the downspout and away from the foundation of your home. Downspout extensions are also necessary to ensure that water is directed far enough away from your home to prevent damage caused by water.
End caps are used to close off the end of the gutter to prevent any debris or water from getting inside. Flashing is used to protect your roof and create a waterproof seal where the roof meets the gutters. Heat tape can be installed in areas where ice dams are common, to prevent damage caused by ice and snow buildup in the gutters.
Finally, splash blocks are used to direct water away from the foundation of your home and prevent erosion. These accessories are essential to ensure that your gutter system works efficiently and protects your home from water damage. When installing these accessories, use screws and sealants to create a secure and watertight seal.
Step 6: Seal the Joints of the Sections Together
To ensure that your seamless gutters work efficiently, it’s crucial to seal the joints of the sections together properly. Here’s how you can do it:
- Lay a bead of gutter sealant along the corner 1-1/2-in. back from the edge. 2. Place the front lip of the corner onto the notched section of the gutter.
- Connect the gutter to the corner by snapping it over and securing it with six rivets in the designated spots.
- To begin, create a 1/8-inch hole at the front of the gutter and proceed to install the initial rivet using a rivet gun.
- Repeat the process until you’ve installed all six rivets.
By following these steps, you’ll be able to seal the joints of your seamless gutters together effectively. This installation process is recommended by Family Handyman, a leading home improvement magazine, for ensuring the proper sealing of gutter joints. Remember to use a high-quality, durable gutter sealant for a secure and long-lasting seal.
Pros and Cons of Making Seamless Gutters at Home

Making seamless gutters at home has both advantages and disadvantages. One advantage is that it can save homeowners money on professional installation costs. Additionally, making seamless gutters at home provides a higher level of customization, allowing homeowners to create gutters that perfectly fit their home’s unique dimensions and aesthetic.
However, making seamless gutters at home requires specialized equipment and expertise. Homeowners must invest in a gutter machine, which can be costly, and must have knowledge of how to use it safely and effectively. Without proper training and experience, homeowners risk damaging the materials and creating imperfect gutters that do not function as intended.
Common materials and tools needed for making seamless gutters at home include gutter material, a gutter machine, rivets, sealant, downspout outlets, and hangers. Proper maintenance is crucial to keep seamless gutters functioning effectively and to avoid costly repairs in the future. Homeowners must clean their gutters regularly, check for damage, and repair any issues promptly. While making seamless gutters at home can provide cost savings and customization options, it is important to weigh the advantages and disadvantages before deciding to tackle this DIY project.
Conclusion
Overall, making seamless gutters at home can be a rewarding DIY project that offers cost savings and customization options. However, it is important to weigh the advantages and disadvantages before deciding to tackle this project, as it requires specialized equipment and expertise. Proper maintenance of seamless gutters is also crucial to keep them functioning effectively and prevent costly repairs in the future. With the right tools and knowledge, homeowners can make their own seamless gutters at home with confidence.