509-201-4190

Batt insulation is a type of insulating material that is commonly used to reduce heat loss or gain in attics, crawl spaces, walls, and floors. It consists of pre-cut rectangular strips or rolls of insulating material such as fiberglass, mineral wool, or cotton. Batt insulation is typically installed between studs, joists, or rafters and can effectively reduce energy bills and improve thermal comfort. In this article, we will provide an overview of batt insulation, including what it is, how to install it in an attic, and its lifespan.
Need a trusted contractor for attic, wall or basement insulation installation?
Call us (509)201-4190 or send the form
Disclaimer: This article is intended to provide general information about batt insulation and should not be taken as professional advice. For specific information or advice regarding your situation, we recommend consulting with a professional insulation contractor like Advance Roofing LLC. We have been proudly serving the Spokane, WA area for many years with top-notch roofing solutions and are happy to provide guidance on batt insulation installation and maintenance.
Benefits of Installing Batt Insulation in Your Attic
Batt insulation is an excellent choice for homeowners who want to reduce energy bills and save money in the long run. This type of insulation is composed of eco-friendly materials that are safe for the environment and people. The benefits of installing Batt insulation in your attic are numerous.
- Batt insulation is a viable energy-saving alternative for homeowners. It offers thermal insulation that retains warmth inside your home during winter and keeps it cool during summer.
- Batt insulation is also an eco-friendly solution. Unlike other insulation types that may emit toxic fumes or contain harmful chemicals, batt insulation is made from sustainable and renewable materials that are safe for the environment and people. This makes it a great choice for homeowners who are concerned about their carbon footprint and want to reduce their impact on the environment.
- Another benefit of batt insulation is its moisture-barrier properties. Batt insulation is designed to repel water, which means it can help to prevent water damage to your home. It also deters rodents, preventing them from making a home in your attic.
- Batt insulation also has noise-absorption capabilities, which means it can help to reduce outside noise levels and make your home quieter. This is particularly useful if you live in a busy neighbourhood or near a busy road.
- Furthermore, batt insulation is an affordable cost option for homeowners. Compared to other insulation types, batt insulation is relatively easy to install and comes with a lower price tag. This makes it a great choice for homeowners who may be on a budget but still want to minimize their energy bills.
- In addition to these benefits, batt insulation is also customizable to fit your specific needs. It can be easily cut to size to fit in hard-to-reach areas, making it a flexible and adaptable option for homeowners who want to tackle DIY projects or work with professional insulation contractors.
Overall, batt insulation contributes to energy efficiency and improves indoor air quality with effective thermal insulation and reduced heat loss. It is an excellent insulation choice for homeowners who want to benefit from its energy-saving, eco-friendly, moisture-barrier, noise-absorption, and cost-effective properties while minimizing environmental impact and improving the comfort and livability of their homes.
Types of Batt Insulation
Batt insulation is a type of insulation made up of pre-cut fiberglass or mineral wool that comes in rectangular sheets. There are various types of batt insulation, each with its unique features and advantages.
Fiberglass Batts
Fiberglass batts are a popular choice for attic insulation due to their affordability and effectiveness. Fiberglass batts are the most common insulation material used in homes across the United States due to their easy availability and installation.
Fiberglass batts are made from thin and flexible man-made fibers that are tightly woven together. They are available in various lengths, widths, and thicknesses to fit different attic spaces. These batts can be installed between attic joists to create a layer of thermal insulation and sound absorption.
- One of the main benefits of using fiberglass batts is their excellent thermal insulation properties. Fiberglass batts trap air pockets within their fibers, which reduces heat transfer between the attic and living spaces. This helps to keep homes warmer in winter and cooler in summer, leading to savings on energy bills. Fiberglass batts also provide an added layer of sound absorption, making them ideal for homes in noisy neighborhoods.
- Another advantage of fiberglass batts is that they are fire-resistant and do not provide a food source for pests such as rodents, making them a safe and healthy choice for attic insulation.
Despite their advantages, there are a few considerations to keep in mind when using fiberglass batts for attic insulation. Proper installation is key to ensuring maximum thermal performance and avoiding air leaks and water damage. Fiberglass batts should be installed with the proper ventilation and vapor barrier to prevent moisture buildup and mold growth.
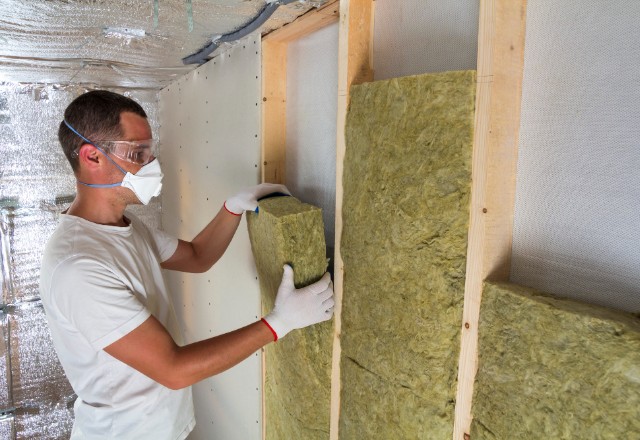
Mineral Wool Batts
Mineral wool batts are another popular type of insulation that are commonly used in attics. Like fiberglass batts, they are made from man-made materials, but instead of glass fibers, mineral wool batts are made from spun rock or slag fibers. This makes them similar in structure to fiberglass batts, but with a few key differences.
One of the biggest advantages of mineral wool batts over fiberglass insulation is their high-density material. This makes them more fire-resistant and blocks sound more effectively, making them an ideal choice for commercial buildings or other areas where noise reduction is important.
The manufacturing process for mineral wool insulation involves melting down rock or slag and then spinning the fibers into a mat. A phenol-formaldehyde binder is added to the fibers to hold them together and increase their strength. This high-temperature process creates a stiff and resilient blanket of insulation that can be cut to fit any space.
Mineral wool insulation is manufactured from various base materials, which are selected based on the intended use. The base materials include rock wool, slag wool, and ceramic fibers, and the lifespan of the insulation will vary depending on the specific material used. It can typically last for 50-100 years.
Mineral wool batts offer several advantages over other types of insulation such as fiberglass, including their high-density material, fire resistance, and sound blocking capabilities. The manufacturing process involves the use of a phenol-formaldehyde binder to create a stiff and resilient blanket of insulation, and they can be made using different base materials depending on the application. With a lifespan of up to 100 years, mineral wool batts are an excellent choice for attic insulation.
Cellulose Batts
Cellulose Batts are a type of eco-friendly insulation that has become increasingly popular due to their energy-saving benefits. They are made from recycled paper and other natural fibers that are treated with a flame retardant material.
- The benefits of Cellulose Batts include being an effective air and heat blocker, making them perfect for both hot and cold climates.
- They can also act as a secondary insulation, providing additional protection to homes and buildings.
- Additionally, Cellulose Batts are much more sustainable than traditional insulation options, as they use recycled materials to manufacture.
However, like most insulation products, Cellulose Batts do have some drawbacks. They can be more challenging to install, and the insulation may settle over time, potentially reducing its effectiveness. They may also be less effective than other options such as spray foam insulation or fiberglass batts.
When installing Cellulose Batts in the attic, certain tools are required, such as a utility knife and a rake to level the insulation. The first step is to ensure that joist alignment is perpendicular to the placement of the Cellulose Batts. This means laying them crosswise towards the first layer, keeping them in a straight line to prevent any gaps in the insulation.
Next, the loose-fill insulation should be raked out evenly across the entire attic space, making sure to avoid overstuffing the space. Any areas that require additional layers should also be addressed during the installation process. It is crucial to follow the manufacturer’s instructions when installing the Cellulose Batts to ensure maximum efficiency.
While Cellulose Batts may not be the perfect insulation solution for every situation, they are a fantastic eco-friendly option that can provide excellent air and heat blocking properties. By following the installation process correctly, homeowners can enjoy an energy-efficient home for years to come.
How Is Batt Insulation Installed?
The installation process for batt insulation is relatively simple, but it is important to follow the proper procedures to ensure maximum effectiveness.
Preparing the Area to be Installed with Batt Insulation for Attics
Before installing batt insulation in your attic, it’s essential to properly prepare the area. Here are some steps to follow:
- Measure the Square Footage: Measure the square footage of your attic to determine how much insulation you will need. This will prevent any shortage of materials and ensure that you have the correct amount of insulation.
- Repair Roof Leaks: Check for any roof leaks and repair any damage before installing the insulation. Roof leaks can create moisture problems that can damage the insulation and weaken its effectiveness, so it is crucial to fix this before starting.
- Seal Air Leaks: Sealing any air leaks in the attic is essential to prevent any insulation from falling and maintain energy efficiency. Seal gaps around windows, pipes, chimneys, ducts, and plumbing vents to prevent warm air from escaping and cold air from entering.
- Cover Lighting Fixtures: Any exposed lighting fixtures in the attic should be covered with metal flashing, hardware cloth, or plywood to prevent contact with insulation and create a safety gap. This is essential to prevent fire hazards and ensure proper ventilation.
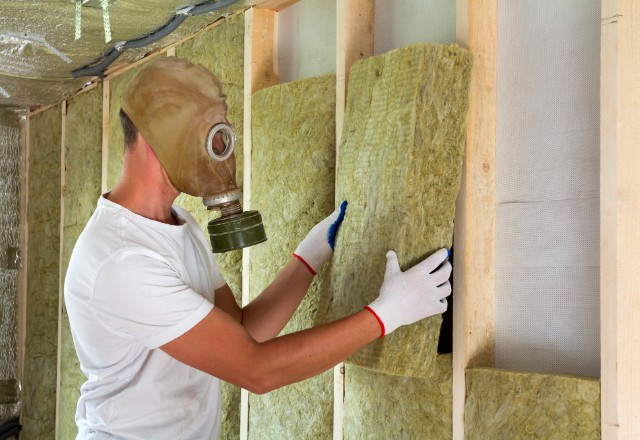
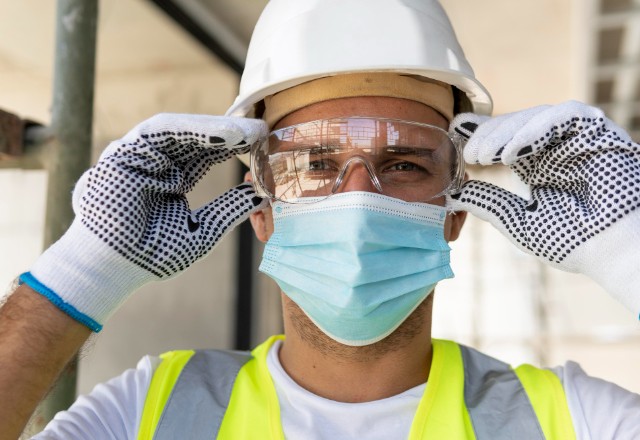
- Wear Protective Gear: It is crucial to wear the proper protective gear before installing insulation. This includes long sleeves, work gloves, goggles, and a dust mask/respirator. Insulation can irritate the skin and lungs, so taking necessary precautions is vital.
- Clear the Attic: Before installing insulation, it is essential to remove any storage items or boxes from the attic. This will make it easier to move around and prevent accidents. Additionally, lay down temporary plywood flooring for safety purposes.
By following these steps, you can ensure that your attic is properly prepared for the installation of batt insulation. This preparation will ensure a more successful installation and a longer lifespan for your insulation.
Tools You Need

If you are planning to install batt insulation in your attic, there are some important tools you will need to have on hand. These tools will not only help you to complete the installation process, but will also help to keep you safe throughout the process.
Here is a list of the tools you will need for batt insulation installation in your attic: 1. Utility Knife: A utility knife is necessary for cutting the batt insulation to size.
- Utility Knife Blades: Make sure to have plenty of extra utility knife blades on hand, as they will become dull quickly.
- Caulking Gun: A caulking gun is needed for applying sealant around any gaps or cracks in your attic.
- Shop Vacuum with HEPA Filter: A shop vacuum with a HEPA filter will help you to clean up any debris and dust that may be generated during the installation process.
- Cordless Drill: A cordless drill will be necessary for drilling holes in your attic’s framing to secure the insulation.
- Staple Gun: A staple gun is used to secure the insulation to the framing of your attic.
- Tape Measure: A tape measure is essential for measuring the space in your attic and cutting the insulation to the correct size.
- Flashlight and Work Light: You will need both a flashlight and a work light to provide ample visibility in your attic space.
- Ladder: A sturdy ladder will be necessary to access your attic.
- Breathing Protection: Because the insulation material can irritate your lungs, it is important to have a quality respirator or face mask on hand.
- Eye Protection: The insulation fibers can also be harmful to your eyes, so wear appropriate safety goggles.
- Gloves: Wearing gloves will help protect your hands from any sharp edges or protrusions in your attic.
By having all of these tools on hand, you will be well-prepared to safely and efficiently install batt insulation in your attic. Remember to always follow good attic insulation safety practices, such as wearing appropriate protective gear, properly sealing any gaps or cracks, and clearing the attic before installation.
Step-by-step Instructions for Installing Batt Insulation in Your Attic

Step 1: Measure the Attic Area and Determine Required Insulation
The first step is to accurately measure the attic area to determine the amount of insulation needed. Measure the length and width of the attic floor and multiply these numbers together. This will give you the total square footage of the area that needs to be insulated. Check with your local building codes to find out the recommended R-value for your area.
Step 2: Identify Air Leaks and Seal Them with Caulk or Foam
Before installing the insulation, identify any air leaks in your attic and seal them with caulk or foam. Common areas for air leaks include around pipes, vent stacks, and electrical
wiring. If you’re unsure where air leaks are located, consider hiring a professional to conduct an energy audit.
Step 3: Prepare the Area to be Installed
Prepare the attic area for installation by clearing out any debris or obstacles that may impede the process. Make sure there is enough space to move around, and that the attic floor is sturdy enough to hold your weight.
Step 4: Wear Protective Gear
Batt insulation can be irritating to your skin and lungs, so wearing protective gear is essential. It’s recommended to wear long sleeves, pants, gloves, safety goggles, and a respirator to prevent any health hazards during the installation process.
Step 5: Gather Necessary Tools
Gather all of the necessary tools needed for the insulation installation. These typically include a sharp knife, stapler, measuring tape, and insulation batts.
Step 6: Install the Insulation
When installing the insulation, begin at the farthest end of the attic and work your way back toward the attic access hatch. Use the sharp knife to trim the insulation to the correct size and shape. Secure the insulation to the attic joists using the stapler, making sure not to compress the insulation material. Depending on the type of batt insulation you are using, the installation process may vary slightly, so refer to the manufacturer’s instructions for more details.
Step 7: Finish Installation
Once the insulation is installed, check to make sure there are no gaps or areas that have been missed. Cover any electrical fixtures or equipment in the attic with insulation or special covers designed for this type of use.
DIY or Call a Pro?
When it comes to insulating your attic, one key consideration is deciding whether to tackle it as a DIY project or to hire a professional insulation contractor. There are several factors to take into account when making this decision, including cost, skill level, and safety precautions.
DIY attic insulation may seem like a cost-effective option, but it requires a certain level of skill and knowledge. One of the most significant hazards of DIY insulation is the risk of falling through the drywall while walking on the edges of attic joists. Homeowners should be familiar with proper safety precautions, including proper footwear and the use of a secure ladder.
Other factors to address during a DIY attic insulation project include blocking out the attic’s intake vents to maintain good airflow and prevent roof damage. Proper ventilation also helps to prevent mold growth and ensures that the insulation works effectively to keep your home warm.
For those considering installing batt insulation in their home, hiring a professional contractor can offer several advantages. Professional insulation installation contractors possess the necessary expertise and knowledge to complete the job correctly. Additionally, they have access to the latest insulation technology and can provide recommendations on the most suitable insulation type for a homeowner’s specific needs.
Cost is another important factor to consider. While hiring a professional may be more expensive initially, the long-term savings in energy bills could offset this cost. Professional insulation contractors also offer warranties that may not be available with DIY installations.
Ultimately, the decision of whether to tackle the installation of batt insulation in an attic as a DIY project or to hire a professional insulation contractor comes down to your skill level and comfort level with the project. If you have experience with similar projects and feel confident in your ability to insulate your attic, a DIY approach may be suitable. However, if you are unsure about safety precautions, lack experience with home improvement projects, or want to ensure optimal results, hiring a professional insulation contractor is likely the best option.
Cost of Batt Insulation

When considering batt insulation for your attic, one of the most important factors to consider is the cost. The overall cost of batt insulation installation will depend on several factors, including the size of the area being insulated, the type of insulation, and the level of insulation needed to achieve the desired energy efficiency results.
The various types of batt insulation available on the market today include fiberglass, mineral wool, and cellulose. The cost varies according to the type of insulation, with fiberglass batt insulation being the most affordable of the three. Cellulose is more expensive than fiberglass, but less expensive than mineral wool.
- On average, homeowners can expect to pay between $0.70 and $1.50 per square foot for fiberglass batt insulation.
- Mineral wool insulation is slightly more expensive, with an average cost between $1.00 and $2.00 per square foot.
- Cellulose insulation is the most expensive of the three, with an average cost of $1.50 to $3.00 per square foot.
It’s important to keep in mind that these cost estimates are generalizations, and costs can vary significantly depending on the size of the area to be insulated and the location of your home. In some regions, insulation contractors may charge more or less than the national average.
DIY installation of batt insulation may seem like a way to save money, but it is important to consider the potential safety risks involved, particularly if you are unfamiliar with the process. The cost of hiring a professional insulation contractor can vary, but is typically between $1.50 and $3.00 per square foot, depending on the factor’s mentioned above.
If you are looking to save money on batt insulation installation, there are a few ways to do so without compromising quality. For example, you can purchase insulation in bulk to
receive a discount or take advantage of any government incentives or rebates for energy efficient upgrades. Additionally, it’s a good idea to shop around for quotes from several different insulation contractors to ensure you are getting the best price possible without sacrificing quality.
Lifespan of Batt Insulation
The lifespan of batt insulation is an important factor to consider when planning to install insulation in your home. The longevity of batt insulation can vary depending on several factors, including the quality of installation, the type of material used, and the environment where it is installed.
Fiberglass and mineral wool batts are known to be very durable and can last up to 100 years if properly installed. This is due to their non-corrosive nature and resistance to pests. On the other hand, cellulose batts are less durable and usually last around 20-30 years.
However, even the most durable insulation material can have significantly reduced lifespan if not installed properly. Poor installation can lead to gaps in the insulation, which can compromise its effectiveness and shorten its lifespan. It’s important to hire a professional insulation contractor who has the necessary experience and expertise to install batt insulation correctly.
Another factor that affects the lifespan of batt insulation is the environment where it is installed. Exposure to moisture or water damage can significantly reduce the lifespan of any type of batt insulation. For example, if the insulation is installed in an attic with insufficient ventilation, the insulation can absorb moisture from the air and lose its insulating properties.
To ensure the longevity of batt insulation, it’s crucial to properly maintain and inspect it regularly. Any signs of damage or wear should be addressed immediately to prevent further damage to the insulation.
Conclusion
In summary, properly installed batt insulation in the attic can provide long-lasting benefits such as energy savings, improved comfort, and increased home value. While durable and resistant to pests, insulation material lifespan can be reduced by poor installation and exposure to moisture. Regular maintenance and inspections can ensure the longevity of the insulation and prevent further damage.
If you are unsure about the state of your current insulation, we encourage you to schedule an inspection with Advance Roofing LLC. Our team of insulation experts can assess your attic’s insulation and provide recommendations for any necessary repairs or upgrades.
Don’t wait until your energy bills start to rise or your home feels uncomfortable. Contact us today to learn more about our insulation services and schedule an appointment. Let us help you make your home more energy-efficient and comfortable for years to come.