509-201-4190

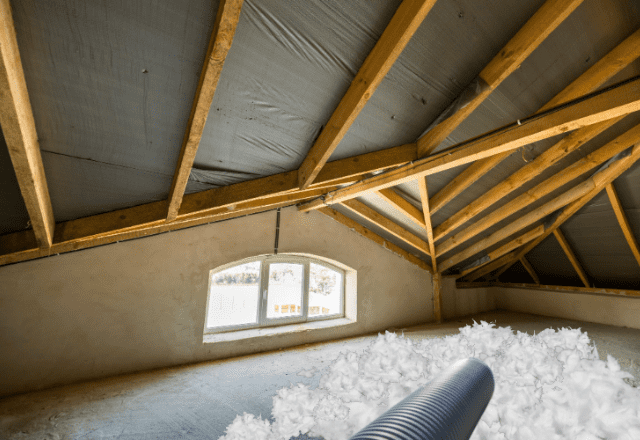
Blown-in attic insulation is a type of insulation that is installed by using a blower machine to blow loose-fill insulation into an attic space. This type of insulation can reduce energy bills and increase energy efficiency by providing a barrier to air leaks and heat transfer. Blown-in attic insulation can be made from a variety of materials, including fiberglass and cellulose, and can be installed by a professional insulation contractor or by a homeowner with the proper equipment and protective gear. In this article, we will cover all of the important aspects of blown-in attic insulation, including cost, pros and cons, installation process, and removal.
Need a contractor for blown-in attic insulation installation?
Call us (509)201-4190 or send the form
Disclaimer: The information provided in this article is for educational and informational purposes only and does not constitute professional advice. While we strive to provide accurate and up-to-date information, we make no guarantees or warranties of any kind regarding the accuracy, completeness, or reliability of the content contained herein. For specific advice on how to properly install blown-in attic insulation, please consult a qualified professional. Additionally, if you need help with selecting the right insulation for your home, Advance Roofing LLC has been proudly serving the Spokane, WA area for many years with the highest standard of quality roofing solutions. We are always happy to offer our expertise!
Benefits of Blown-in Attic Insulation
Blown-in attic insulation is a popular method to create a comfortable and energy-efficient home. This type of insulation is commonly used to save owners money on their energy bills by creating a thermal barrier that prevents heat transfer. Blown-in insulation is often considered a better option than traditional methods of insulation due to its ability to fill every nook and cranny of the attic.
- One of the significant benefits of blown-in attic insulation is that it can help reduce energy bills significantly. With blown-in insulation, air movement is restricted, and heat is prevented from escaping, keeping the home warm and comfortable.
- By reducing the amount of heat that is lost through the attic, homeowners can save money on their HVAC systems’ energy costs. Additionally, blown-in insulation can help prolong the life of HVAC systems by reducing their workload as they don’t have to work as hard to maintain the indoor temperature.
- The insulation act as a barrier between the inside and outside environment reducing noise transmissions and also improves the indoor air quality by limiting airflows and prohibiting external pollutants and toxins from penetrating the home.
- Blown-in insulation comes in different types such as fiberglass and cellulose, with each type offering additional benefits, such as soundproofing or moisture control. Fiberglass insulation is made from recycled glass and is known for its great insulating properties, while cellulose insulation is made from recycled paper and is known for its resistance to moisture.
- Finally, blown-in insulation offers a unique and effective way to fill every corner and crevice of the attic that traditional methods of insulation might miss. This comprehensive approach ensures that the attic is completely insulated, creating a thermal barrier and enhancing the home’s energy efficiency.
Lifespan of Blown-in Attic Insulation
Blown-in attic insulation is known for providing excellent thermal protection and energy efficiency to homes. However, it’s important to keep in mind that it does have a lifespan. This lifespan can vary depending on several factors, such as the type of materials used, environmental conditions, and the insulation’s quality and installation.
Fiberglass blown-in insulation typically lasts around 35 to 40 years, while cellulose blown in insulation might last around 20 to 30 years. However, the insulation’s lifespan can be significantly reduced if it becomes wet or damaged due to a roof leak, for example.
Several other factors can also affect the longevity of blown-in insulation in the attic. Poor installation, air leaks, moisture, pests, and improper ventilation can all cause issues and reduce the insulation’s lifespan. It’s crucial to keep an eye on the insulation and replace it if necessary to ensure the best possible performance and energy savings.
To optimize the blown-in insulation’s performance, measuring the thickness is crucial. The recommended thickness depends on the type of insulation, but as a general rule of thumb, it should be around 14 inches. Measuring the thickness regularly and ensuring it meets the recommended thickness can help maximize the insulation’s energy efficiency.
Types of Blown-in Attic Insulation
Blown-in insulation is a popular choice for attics because it can be easily installed and is cost-effective. There are various types of blown-in insulation available on the market, each with its own unique benefits and drawbacks. Before deciding on which type of insulation to use, it’s essential to consider factors such as energy efficiency, budget, and the climate in your area.
Fiberglass Batts
Fiberglass batts insulation is a type of insulation made from fine glass fibers that are interlaced to create rolls of insulation. This type of insulation is one of the most common types used in homes and buildings today. Fiberglass batts have a cotton-candy appearance and are typically installed in wall cavities and between joists in attics and crawl spaces.
One of the main advantages of fiberglass batts insulation is its R-value, which measures the insulation’s resistance to heat transfer. The higher the R-value, the better the insulation’s ability to resist heat flow. Fiberglass batt insulation typically has an R-value of around R-2.9 to R-3.8 per inch, making it a popular choice among homeowners looking to improve energy efficiency in their homes.
Fiberglass batt insulation is made by melting sand and other recycled materials down to create the glass fibers. The fibers are then put through a spinneret and woven into rolls. In some cases, an adhesive is added to the fibers to help them stick together. While fiberglass batt insulation has many benefits, it also has some drawbacks.
One of the main challenges of using this insulation is installing it in odd spaces. The rolls can be difficult to cut and shape to fit in small spaces, and the fibers can be irritating to the skin and lungs if inhaled. Proper personal protection gear, such as a mask and gloves, is needed during installation to avoid respiratory problems and skin irritation.
Another downside of fiberglass batt insulation is that it doesn’t perform well in wet conditions. If the insulation gets wet from burst pipe water damage or roof leaks, it can become saturated and lose its insulation properties. Additionally, if it gets wet, it can promote mold growth and create health problems for homeowners, making it unsuitable for certain areas of the house.
Overall, fiberglass batt insulation is an effective and popular choice for improving energy efficiency in homes. Its R-value is high enough to make a difference in energy costs, and it’s relatively cost-effective to purchase and install. However, it’s important to take the necessary precautions and use protective gear during installation and to avoid using it in areas with potential moisture problems.
Loose-Fill Insulation
Loose-Fill Insulation, also known as blown-in insulation, is a popular alternative to the more traditional fiberglass batt insulation that requires cutting and fitting rolls into place. While both types of insulation serve the same purpose of insulating living spaces, Loose Fill Insulation has some unique characteristics and benefits.
Loose-Fill Insulation is made up of small, loose fibers or particles of material such as fiberglass insulation, cellulose insulation, or rock wool. These materials are blown into the attic space or wall cavity using a specialized machine, creating a layer of insulation that conforms to any size or shape of the space. The biggest benefit of Loose-Fill Insulation is its ability to fill small gaps and air leaks that can contribute to energy loss, making it a great choice for those seeking to improve their home’s energy efficiency.
Installing Loose-Fill Insulation requires specialized equipment, including a blower machine, to efficiently distribute the insulation throughout the space. A professional insulation contractor should be hired to ensure proper installation, as DIY installation can be time-consuming and tricky.
There are different types of materials used for Loose-Fill Insulation, each with their own set of advantages and disadvantages.
- Fiberglass insulation is a common choice due to its relatively low cost and high R-value, but it can be irritating to the skin and lungs if not properly handled.
- Cellulose insulation is made from recycled materials and is effective at reducing air leaks, but can be susceptible to mold growth if it gets wet.
- Rock wool insulation is fire-resistant and has good soundproofing capabilities, but can be more expensive than other materials.
It is important to take safety precautions and best practices when installing Loose-Fill Insulation. Protective gear such as gloves, goggles, and a mask should be worn during installation to avoid respiratory problems and skin irritation. The insulation should also be installed evenly and not overcompressed, as this can limit its effectiveness.
Spray Foam Insulation
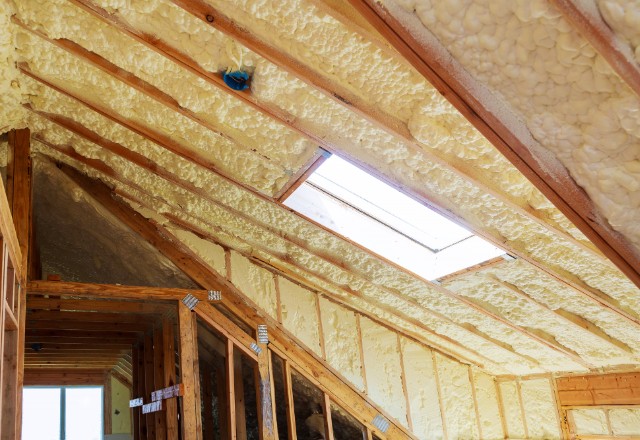
Spray Foam Insulation is a type of liquid insulation that is sprayed into walls, floors and ceilings to provide superior insulation and fill gaps that significantly reduce air leakage. The liquid insulation material is sprayed using specialized equipment that combines two separate components, polyurethane and isocyanate, creating a foam that expands and hardens into an insulating layer.
One of the biggest advantages of Spray Foam Insulation is its impressive R-value, which is a measure of its heat resistance. Spray Foam has an R-value of approximately 6.5 per inch, which is much higher than other types of insulation materials such as fiberglass. Spray Foam also offers excellent air sealing capabilities, keeping your home more comfortable and reducing energy costs.
During installation, the liquid insulation is sprayed onto the surface to be insulated, where it quickly expands and fills every nook and cranny to create a seamless, airtight barrier of insulation. The foam hardens within a minute or two and can be trimmed and finished to create a smooth surface.
While Spray Foam Insulation is more expensive than other types of insulation materials, its ability to fill all gaps and provide superior insulation can be well worth the investment. Costs range from $1.50 to $4.30 per square foot when professionally installed, depending on the location and complexity of the installation.
Cellulose Insulation
Cellulose insulation is a popular choice for homeowners looking to improve their home’s energy efficiency and reduce their utility bills. There are two primary types of cellulose insulation: loose-fill and dense-packed. It is essential to understand these types to determine which one is best suited for your insulation needs.
- Loose-fill cellulose insulation is loosely blown into place using a special machine. This type of insulation is ideal for attics, walls, and other areas with lots of obstructions. Loose-filling is also suitable for topping up existing insulation. It is made from recycled newspaper treated with borate to make it fire-retardant and insect-resistant. Loose-fill insulation is best suited for covering a large insulation area and providing additional insulation in an existing structure.
- Dense-packed cellulose insulation is used in existing walls and new constructions where the walls are already closed. It is blown into the wall cavities under pressure using a specialized machine that packs the insulation tightly to fill every nook and cranny. This type of insulation is made from cellulose fibers, which offer excellent thermal protection. Dense-packed cellulose insulation is perfect for preventing air leaks in between the wall studs, creating an airtight seal that provides high energy efficiency.
When considering which type of cellulose insulation to choose, it is important to assess the structure of your home. If you have an attic or an open wall cavity you want to insulate, loose-fill cellulose insulation may be the best option. Meanwhile, if you’re constructing a new home or need to creating a sealed wall cavity, then dense-packed cellulose insulation is the option to go for. It is also crucial to consider primary types of insulation area and your insulation needs before settling on any of the two types of cellulose insulation available. By making an informed decision when choosing cellulose insulation, homeowners can improve their home’s energy efficiency and reduce energy costs.
Measurement and Installation Process for Blown-in Attic Insulation
Blown-in attic insulation is a type of loose-fill insulation ideal for adding insulation to attics without disturbing the existing structure. Blown-in insulation can also be used to retrofit walls and floors with existing insulation. One of the most significant benefits of blown-in insulation is its hassle-free installation process, which does not require extensive labor or time-consuming procedures.
Calculating the Square Footage of Your Attic Space

Calculating the square footage of your attic space is the first step in determining how much blown-in insulation you will need to install. To accurately calculate the square footage of your attic space, follow these steps:
Step 1: Measure the Length and Width of Your Attic
Using a measuring tape, measure the length and width of your attic space in feet. Make sure to measure from wall to wall and from one end of the attic to the other.
Step 2: Multiply Length and Width to Get Total Area
Multiply the length and width measurements together to get the total area in square feet. For example, if your attic measures 20 feet by 30 feet, the total area would be 600 square feet (20 x 30 = 600).
Step 3: Account for Areas with Lower Ceilings or Dormers
If your attic has areas with lower ceilings or dormers, measure those spaces separately and add them to the total square footage. For example, if you have a dormer that measures 10 feet by 8 feet, the additional square footage would be 80 square feet. Add this to the total area calculated in step 2 to get the final square footage.
It’s important to accurately calculate the square footage of your attic space when determining the amount of blown-in insulation needed for proper installation. This will ensure that your insulation is installed correctly and that you achieve optimal energy efficiency in your home.
Preparation for Installation Process
Before starting the installation process of blown-in attic insulation, it is crucial to properly prepare the area. Neglecting to prepare the area correctly can result in insulation damage and decreased energy efficiency. Thus, it is essential to take the time to ensure that the area is ready for insulation installation.
The preparation process primarily involves sealing any air leaks in the attic. Air leaks can cause significant heat loss and damage to the insulation, resulting in increased energy costs and decreased insulation effectiveness. Sealing these air leaks prevents air from escaping or entering the attic and helps to optimize energy efficiency.
To seal air leaks, materials such as spray foam and weatherstripping are needed. These materials stop drafts from entering the attic, ensuring that insulation remains in good condition. Using a caulking gun and utility knife are essential tools that should be readily available during the preparation process.
A caulking gun helps to apply the spray foam uniformly and adequately to the air leaks, while a utility knife is useful in trimming any excess insulation or weatherstripping. The use of protective gear such as gloves and respirators is also vital to ensure that the process remains safe.
Common Tools Used for Installation

Installing blown-in attic insulation requires the use of several common tools to ensure a successful outcome. These tools include a drill/driver with bits, work gloves, eye protection, a dust mask, hard hat, knee pads (optional), a tape measure, work light, and a pencil. Here are more details on using these tools during installation:
- Drill/driver with bits – A drill/driver with drill bits of different sizes is necessary to make holes in the attic to be able to blow the insulation between the joists. The drill/driver should be powerful enough to make clean and precise holes.
- Work gloves – Work gloves protect your hands from cuts and abrasions while handling insulation materials that can be abrasive.
- Eye protection – Installing insulation can be hazardous to the eyes due to the small particles that can be kicked up towards them. Eye protection such as goggles or safety glasses can prevent eye injuries.
- Dust mask – During insulation installation, it is important to wear a dust mask to prevent inhaling harmful particles or fibers from the insulation that can cause respiratory irritation.
- Hard hat – A hard hat offers protection to the head from any accidental falls or slipping that are common when installing insulation in tight and confined spaces.
- Knee pads (optional) – Knee pads can make the installation process more comfortable, especially when working on your knees for extended periods.
- Tape measure – A tape measure is important to measure the distance between joists or the length of the areas to be covered.
- Work light – A work light illuminates the attic to ensure accurate measurement, placement, and insulation coverage.
- Pencil – Marking areas to be insulated can aid in organization during the installation process.
- Insulation blowing machine – An insulation blowing machine is rented from a hardware store or home improvement center. It is critical to use the right type of machine for the type of insulation and the size of the attic space.
Steps to Take During the Installation Process
It’s important to follow the correct installation process to ensure a safe and effective installation. Here are the steps to take during the installation process:
Air Sealing and Checking for Roof Leaks
Before installing blown-in insulation, it’s important to check for any air leaks in the attic and any potential roof leaks. Air sealing prevents air leakage and keeps the insulation from settling over time. Roof leaks can lead to moisture issues and mold growth, so it’s important to address them before installing insulation.
Equipment and Protective Gear
Wearing the proper clothing and using the right equipment is crucial during the installation process. Protective gear such as gloves, eye protection, and a dust mask should be worn to prevent contact with insulation materials. A blower machine is also essential for evenly distributing the insulation throughout the attic space.
Calculating the Square Footage and Preparation
Next, calculate the square footage of the attic space to determine how much insulation is needed. It’s important to take note of any areas that may require additional insulation. Before installing, ensure that any electrical wiring and light fixtures are covered to avoid contact with insulation.
Installing the Blown-In Insulation
Start by spreading the insulation evenly across the attic floor, being careful not to block ventilation or exhaust fans. Use a blower machine to distribute the insulation to an even depth. Be sure to cover all areas including corners, edges, and any hard-to-reach spaces. Periodically check the depth of the insulation to ensure that it’s evenly spread throughout the attic space.
Benefits of Installing Blown-in Attic Insulation

Installing blown-in attic insulation has several benefits that homeowners can enjoy. This type of insulation is a cost-effective solution for improving energy efficiency and reducing utility bills. Blown-in insulation is also easy to install, making it a popular choice for many DIY homeowners. Let’s dive in and discover the many benefits of blown-in attic insulation.
Impact on Energy Bills and Utility Costs
Blown-in attic insulation has the potential to have a significant impact on energy bills and utility costs for homeowners. Upgrading or adding blown-in insulation can lead to significant cost savings over time, making it a wise investment for those looking to improve the efficiency of their home.
One major benefit of blown-in insulation is its ability to seal air leaks in the attic space. This can have a profound effect on HVAC performance, as it reduces the amount of hot or cold air that escapes the living space and helps maintain a more consistent temperature throughout the home. This results in a more comfortable and energy efficient indoor environment, ultimately leading to lower energy bills and utility costs.
In fact, industry studies have shown that adding blown-in insulation to an attic can deliver an average of 20% cost savings on energy bills. Additionally, the cost of installation can typically be recouped in three to four years, making it a cost-effective upgrade for most homeowners.
Improved Energy Efficiency in Home or Buildingwith Blown-in Attic Insulation
Blown-in attic insulation is an effective way to improve the energy efficiency of a home or building. By properly installing blown-in attic insulation, heat loss and heat gain can be minimized, leading to lower energy costs.
Cellulose and fiberglass are considered the most energy-efficient types of blown-in attic insulation, as they effectively prevent heat flow through the attic space. Cellulose insulation is made up of recycled materials, making it an eco-friendly option. Furthermore, it can be treated with a fire retardant to improve safety. Fiberglass, on the other hand, is made up of tiny glass fibers and can easily conform to the shape of an attic space.
The R-value quantifies the capacity of insulation to impede the transfer of heat. Insulation with a higher R-value tends to have better performance. Both cellulose and fiberglass blown-in attic insulation have high R-values, making them effective at minimizing the transfer of heat between the attic space and living areas of the home or building.
In addition to improving energy efficiency, proper attic insulation with blown-in insulation can also prevent moisture buildup and mold growth. Moisture can accumulate in the attic space due to temperature differences and air leaks, which can lead to mold growth and other health hazards. By preventing moisture buildup, blown-in attic insulation can improve indoor air quality and promote a healthier environment.
Conclusion
Proper installation of attic insulation is an essential factor in achieving energy efficiency and reducing utility bills. It is crucial to work with insulation contractors and ensure that the installation is done correctly with the proper equipment and protective gear. Moreover, choosing the right type of insulation for your home depends on several factors, including attic space, energy efficiency goals, and budget.
Overall, proper attic insulation with blown-in insulation can significantly impact energy efficiency and utility bills while promoting a healthier living environment. Therefore, it is essential to consider insulation installation as a necessary investment in your home’s energy efficiency and long-term savings.